

Case study
SmartX Partner Portal
Tackling a complex large-scale project.
role
Only designer
Platform
Web
My Contribution
UI / UX Design
Product Management
Project Management
Introduction
SmartX Partner Portal is a web application built for the sales team at SmartX and their partners. It's designed for helping company improve internal and external communication effectiveness. It helped sales team track potential business opportunities and share product and sales resources with partners.
SmartX used Salesforce to track and update business opportunities. Sometimes these business opportunities were found by partners, but they can't submit to the system directly. Although Salesforce can integrate with some tools, but it was not flexible enough to involve external users, such as their partners. So they wanted to build a customized application.
There were also some other problems they want to solve in this customized product.
First, there were some sales resources that were essential to sales and partners, such as contract templates, technical white paper, product specs, etc. The resources used to be stored in employee's laptops or emails. SmartX wanted to gather these resources and put them together on the platform.
Second, SmartX needed a newsroom to post some news about sales policy, new released products or new case studies.
Third, SmartX wanted to build a profile page for partners, where partners can update their info, get certification from SmartX.
So they reached out to us with a plan to solve these problems.
100+ Pages: Splitted the project into 8 modules. Delivered more than 100 final design pages in total.
10+ Docs: Wrote more than 10 docs, including PRD, test cases, notification and log copy, UI walk through, etc.

Challenges
Although our client already had a plan to develop four features, we still need to think about it systematically. And we tried to find out how these features should be organized together and what were the hidden problems.
After doing initial researches on similar SaaS tools, we found that we were not only facing some common challenges of SaaS tools, but also some particular challenges of this customized product.
Here were four main challenges we were facing:
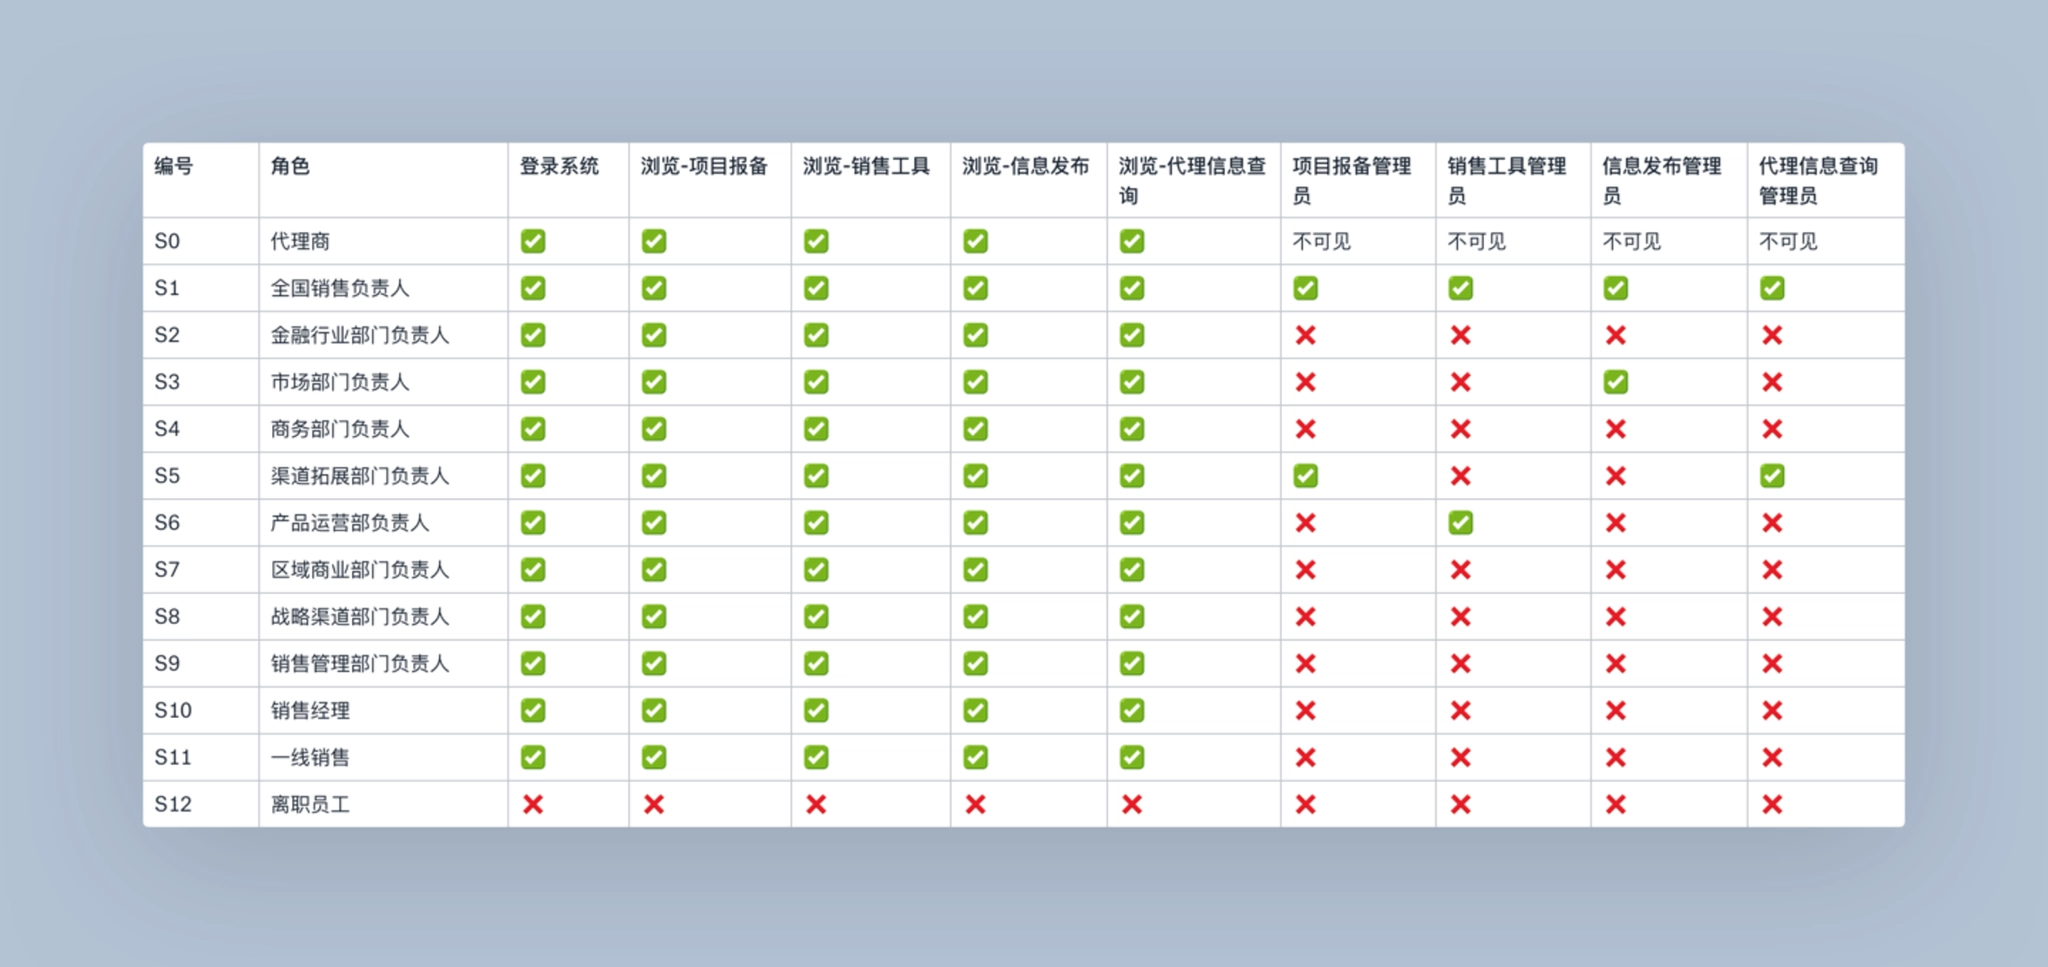
1. It involved multiple roles and wickedly complex permissions.
SmartX Partner Portal would be used by both internal users (sales team) and external users (partners). These two kinds of users played different roles in the product, they had different permissions and user flows.
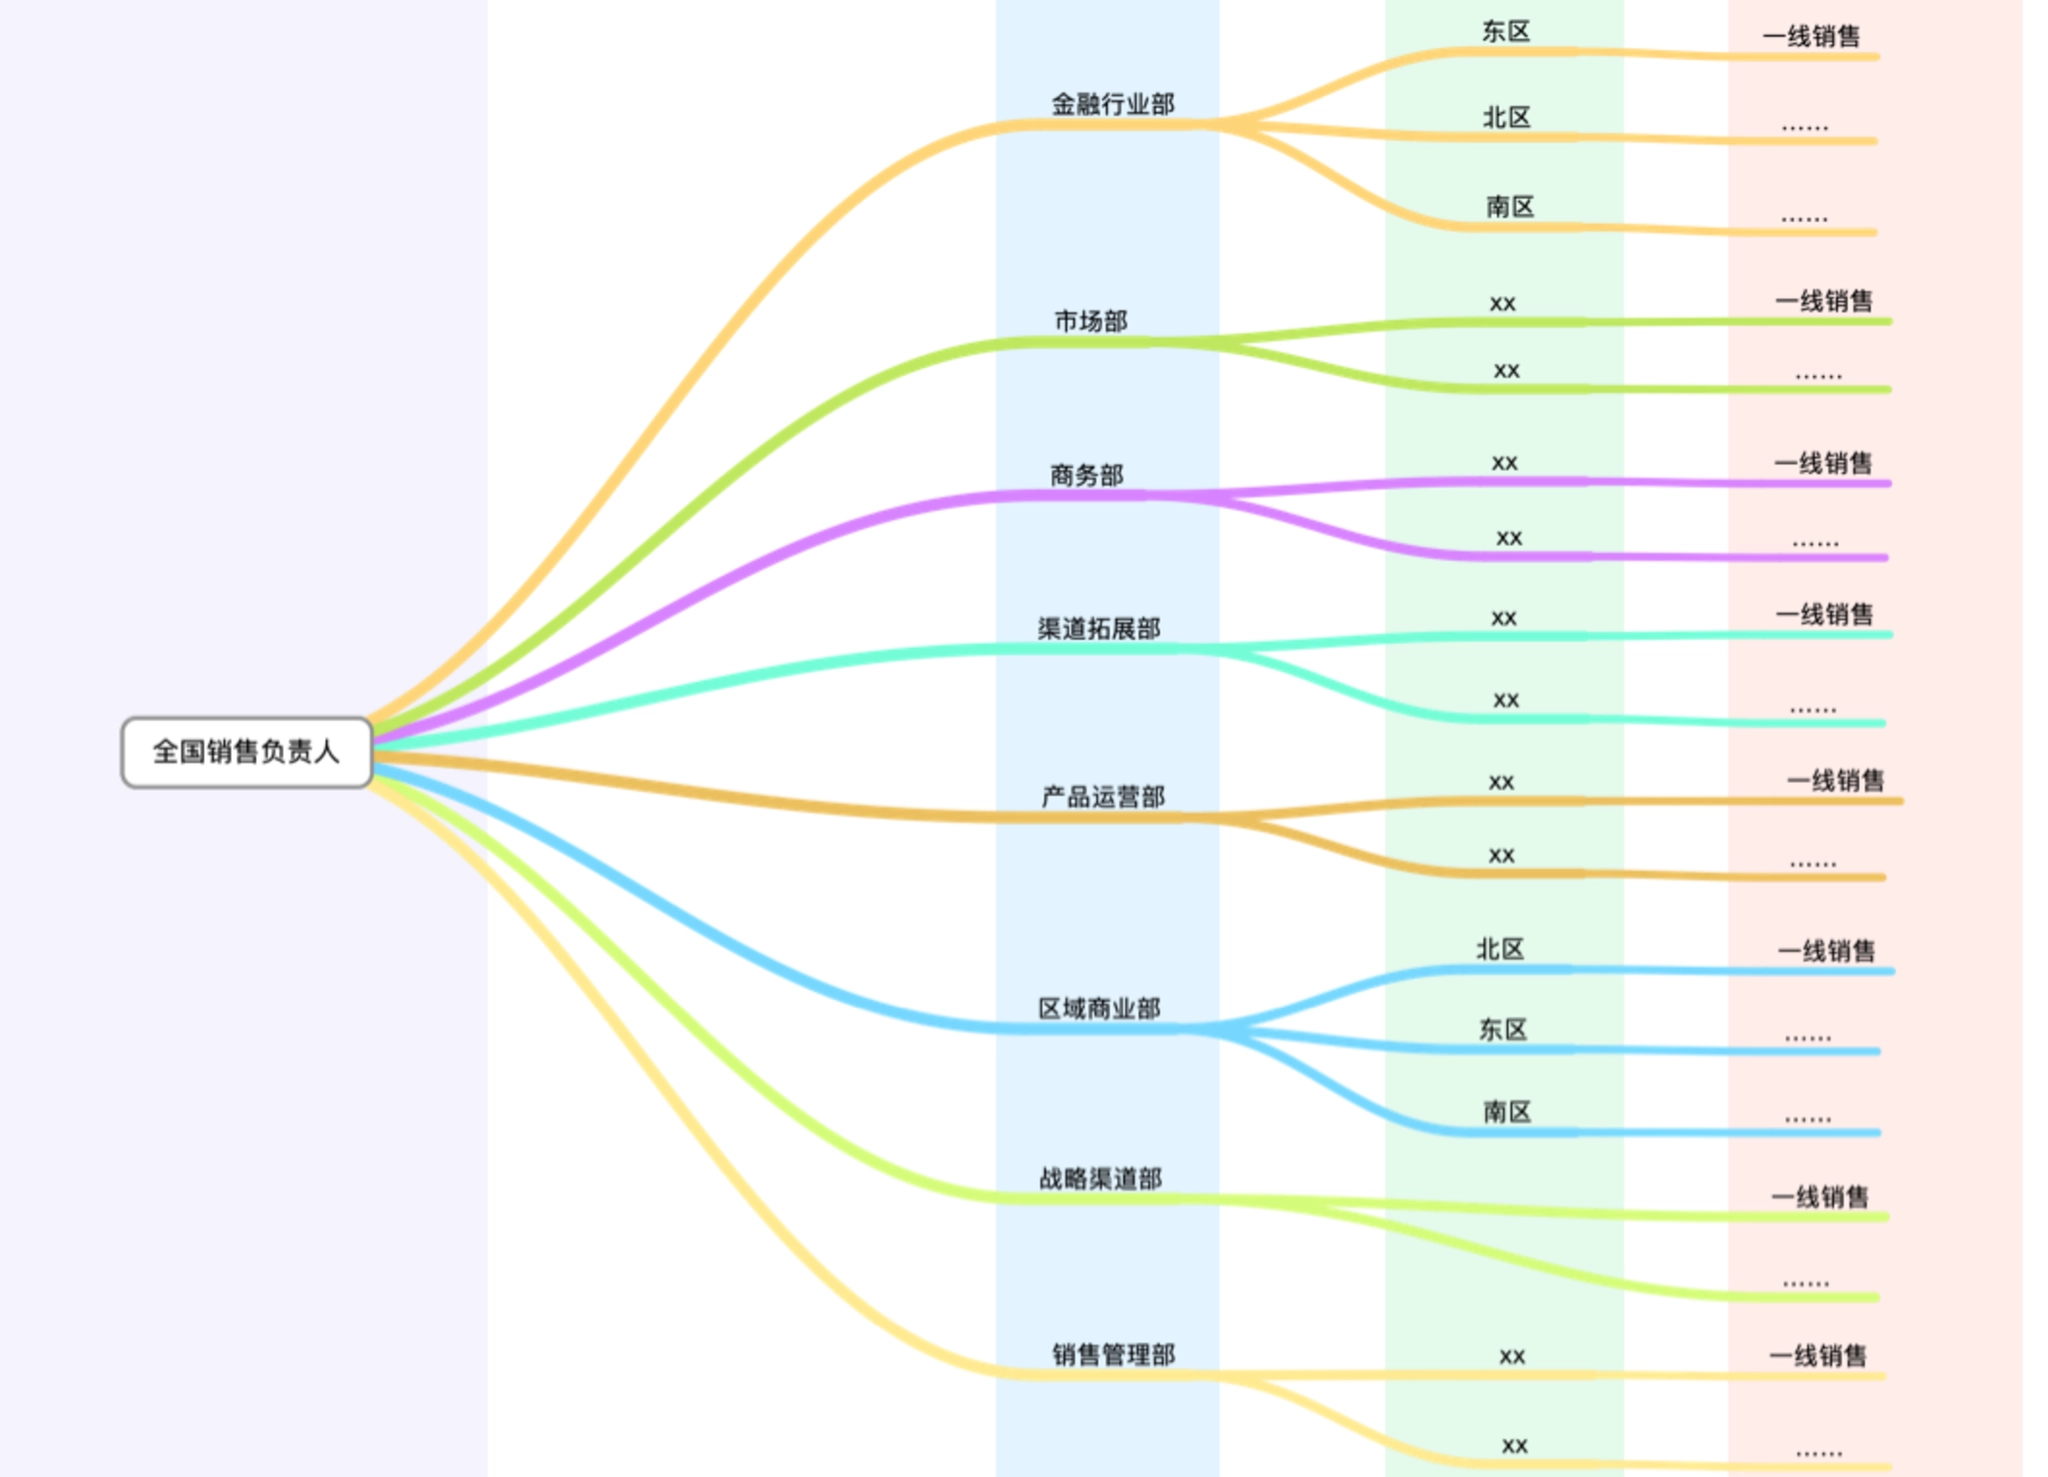
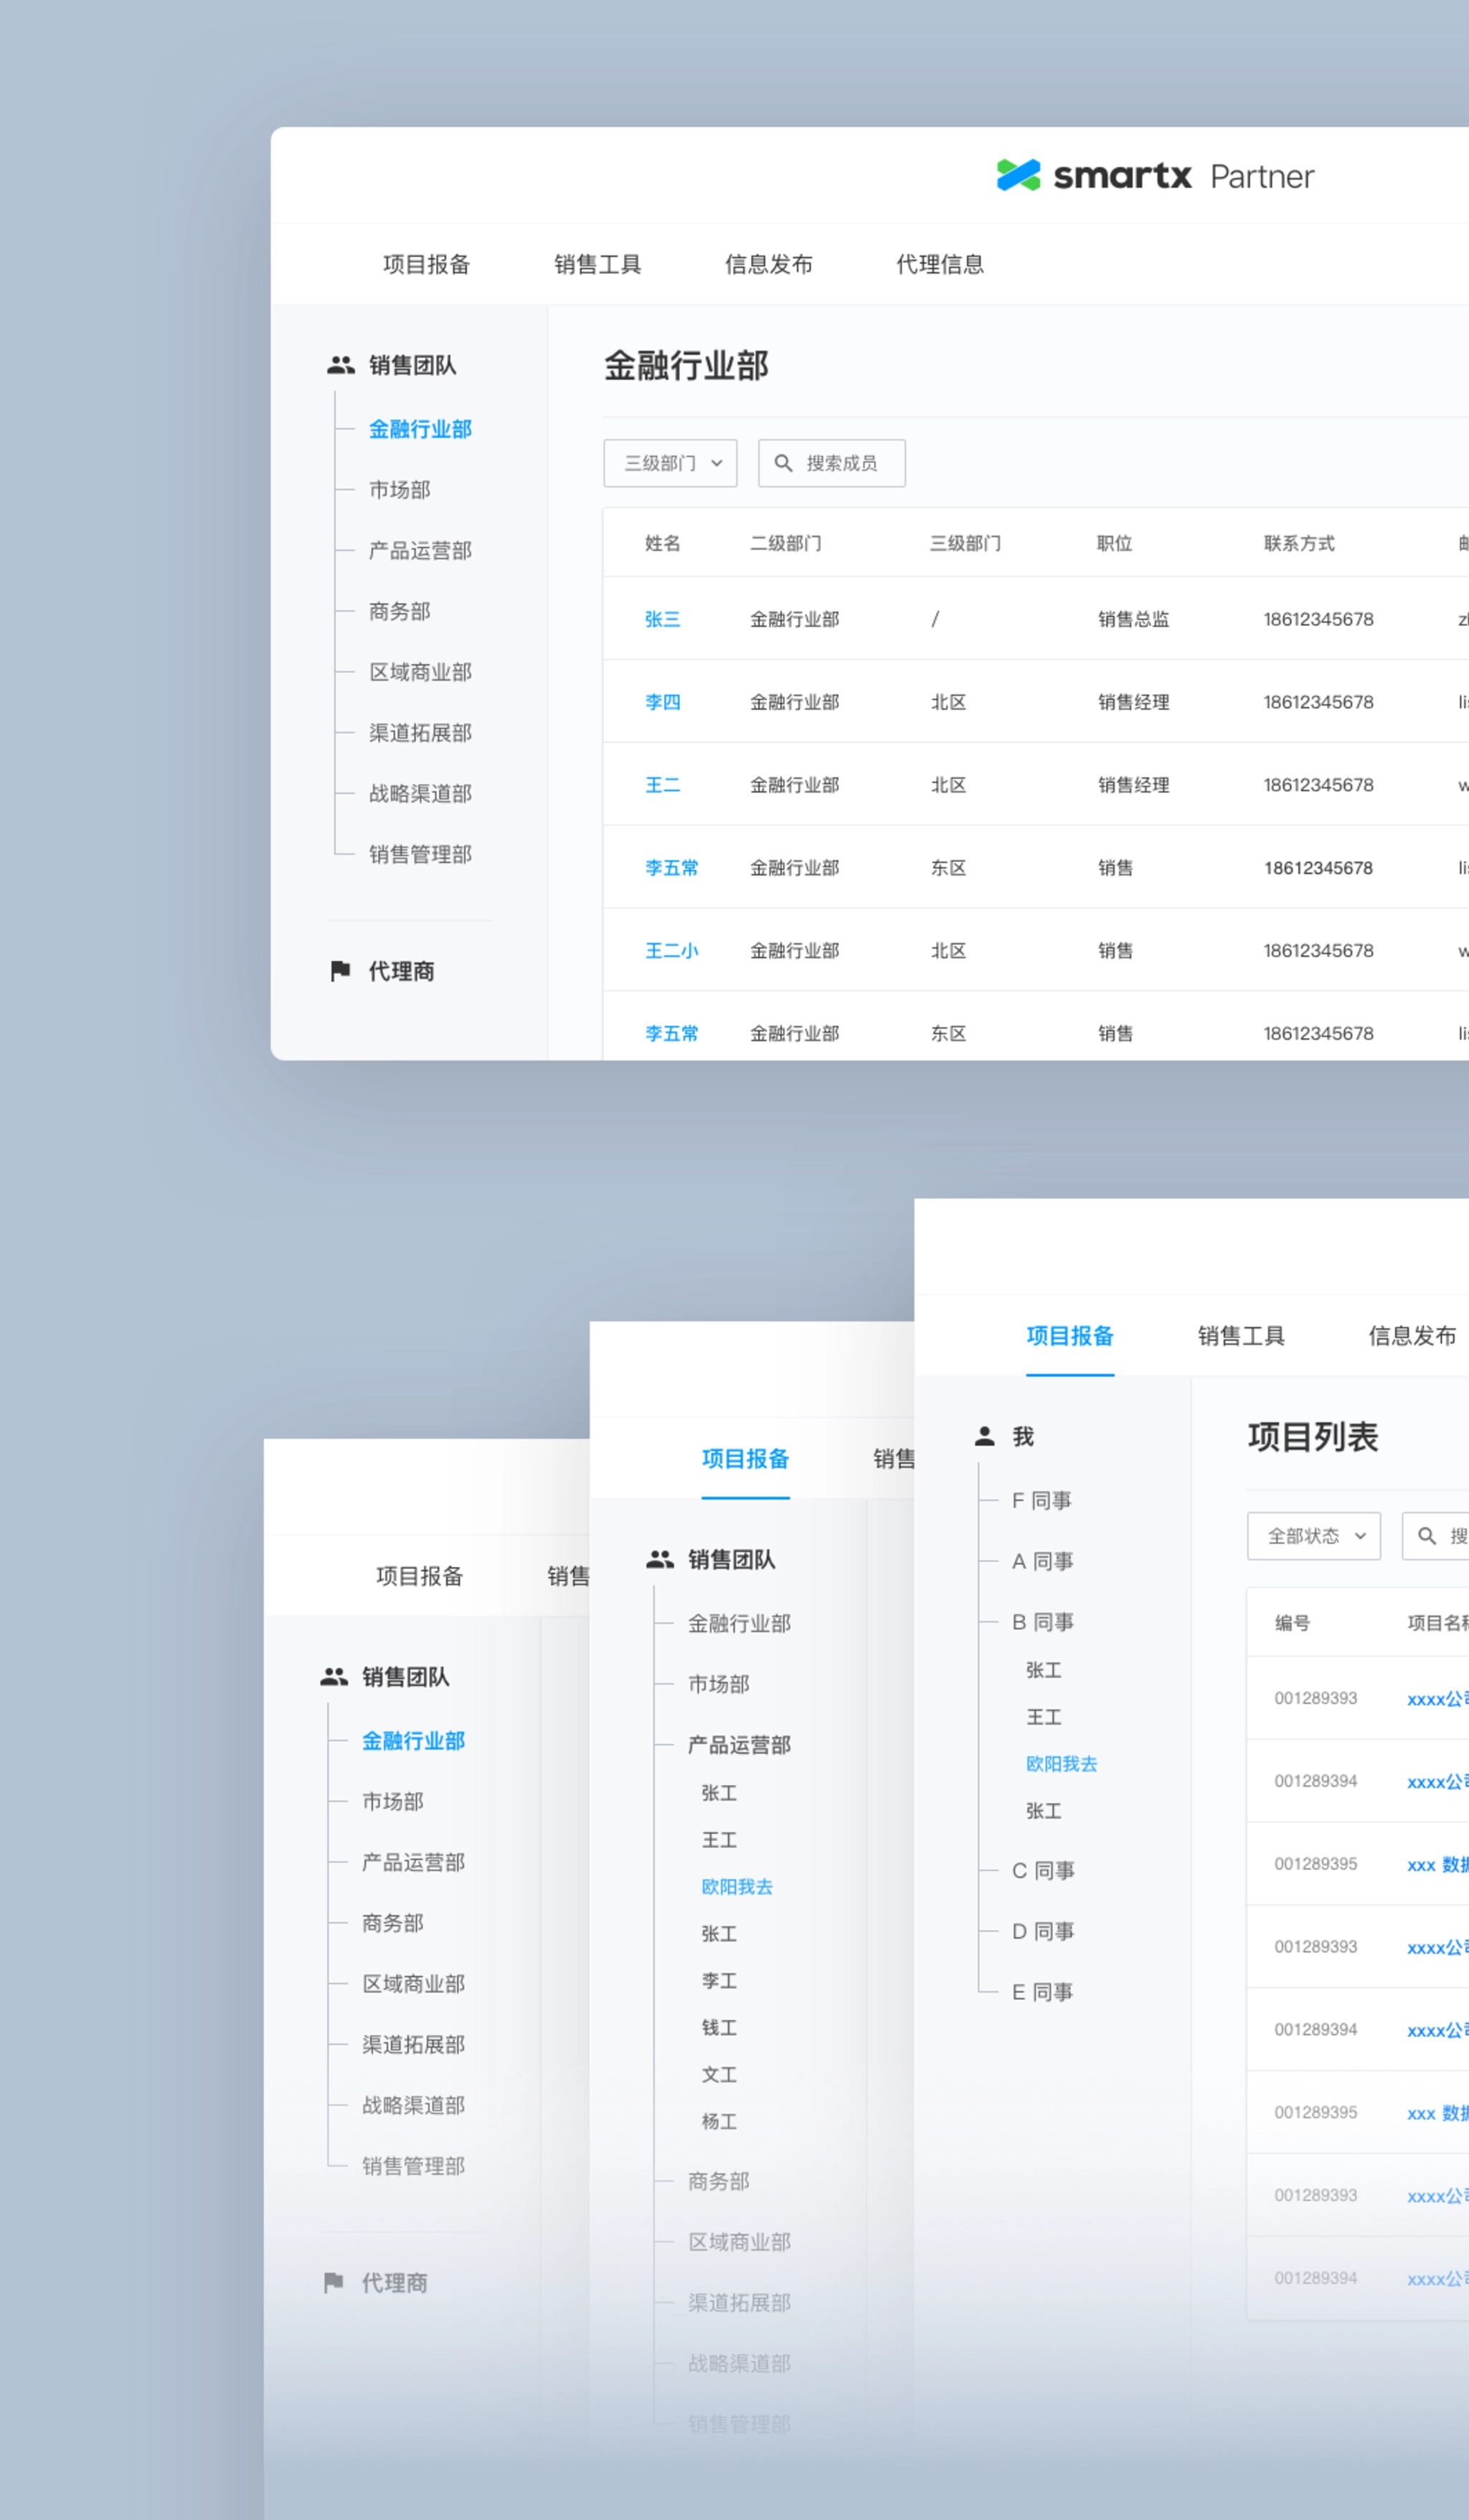
Inside the sales team, there were multiple hierarchies. The team was divided into several departments and sections based on industries and locations. We needed to bring these hierarchies on the web app. By doing that, managers could able to check projects and manage members by departments; leaders also could visit projects belong to their subordinate staff.
Here were the specific requirements about permissions:
- All accounts should be created and managed by head of sales team.
- Members and projects should be organized by departments;
- The managers of a department could visit projects belong to department members.
- Leaders could visit projects belong to their subordinate staff.
- The head of sales could visit logs and projects of all members.
- The permission of partners were limited, they couldn't visit some internal features.
Departments and roles involved in partner portal.
2. It had multiple modules and each module had a complex user flow.
There were four modules about above features. Besides that, there were other fundamental modules, such as account, notification, profile module, etc.
With the involvement of different roles, the product's complexity increased enormously. For example, different roles would have different user flows and interfaces under the same feature.
Business opportunities management
It allows authorized distributors to submit business opportunities to the sales team, then one salesman from the team will follow up, and decide to accept it or request further information.
Sales resources
Business documents used by sales team and distributors, including contract templates, technical white paper, product specs, etc.
Partner profile
Every distributor will have a profile. They need to update their information about company and contact details.
SmartX can provide certification for qualified distributors.
Newsroom
A place to post news about company, new released products, sales policy or new case studies.
3. It had tons of data.
A project contained lots of data, and more data would be generated when this project being modified or updated.
These data generated on the application were seriously important for client, they had a high standard about keeping these data:
- Each action of members and partners should be recorded.
- Each change to a project should be recorded in order to track or rollback.
- Data should be backed up every day.
4. It required a fast and reliable notification function.
Each project would involve at least two members. For example, distributors submitted a business opportunity to the sales team, then one member at sales team will follow up.
The status of a project would be changed frequently, when this happened, everyone related to this project should be notified so that they could take actions immediately. Notification is also a fundamental function to make the system work smoothly and seamlessly.
Design Process
Before we dived into the "design" job, we spent about 3 weeks on doing user researches. We believe that we can only come up with good design solutions when truly understand client's problems.
1. Understand the problems.
Understanding problems is the prerequisite of finding solutions, and we started from understanding users and brand.
The product would be used by both internal users and external users. After making several calls with client, we made a list about all the roles involved in and their permissions. The list included distributors, sales, managers of each department and employees who had resigned.
Then we started to do some researches about client's brand by visiting their website and getting hands on their products. We tried to figure out the "feeling" they want to express through the product. After we had a conversation with head of sales about their thoughts on the product's "style", we knew we were going to design a clean but professional product, also aligned with SmartX brand.
Roles and corresponding permissions included in partner websites.
2. Research
After we had a clear thought about users of the product, we tried to dig deeper. So we spent a lot of time on doing researches, including several rounds of 1:1 interviews and competitive research.
1:1 interviewsWe conducted several rounds of interviews with employees and managers on the sales team. Some of them were interviewed on the phone and others were interviewed in person at their office. We asked questions about:
- their current workflow.
- what were they struggling with?
- how did they collaborate with partners?
- the life cycle of a business opportunity.
- the sales resources that be used in their daily work?
- what were they looking for in the new product?
- ...
Competitive researchWe also did some competitive researches on similar SaaS tools and other products with same features.
- What were the solutions these products provide? What were the pros and cons of them?
- How did these products solve the challenges we were facing? Especially on setting up account and permissions.
- What was the best solution to specific feature? For example, when we did research on project log and version history, we extended our research to popular document tools including Google Docs and Dropbox Paper.
3. Analyze
After gathering enough information we need, we started to analyze them and turned them into insights. We chose online collaboration document and invited client to join in. By doing that, we could get immediate feedback from them and avoid mistakes.
We had 3 main outcomes in this step: PRD, User flows of main features and a list of all pages I need to design later.
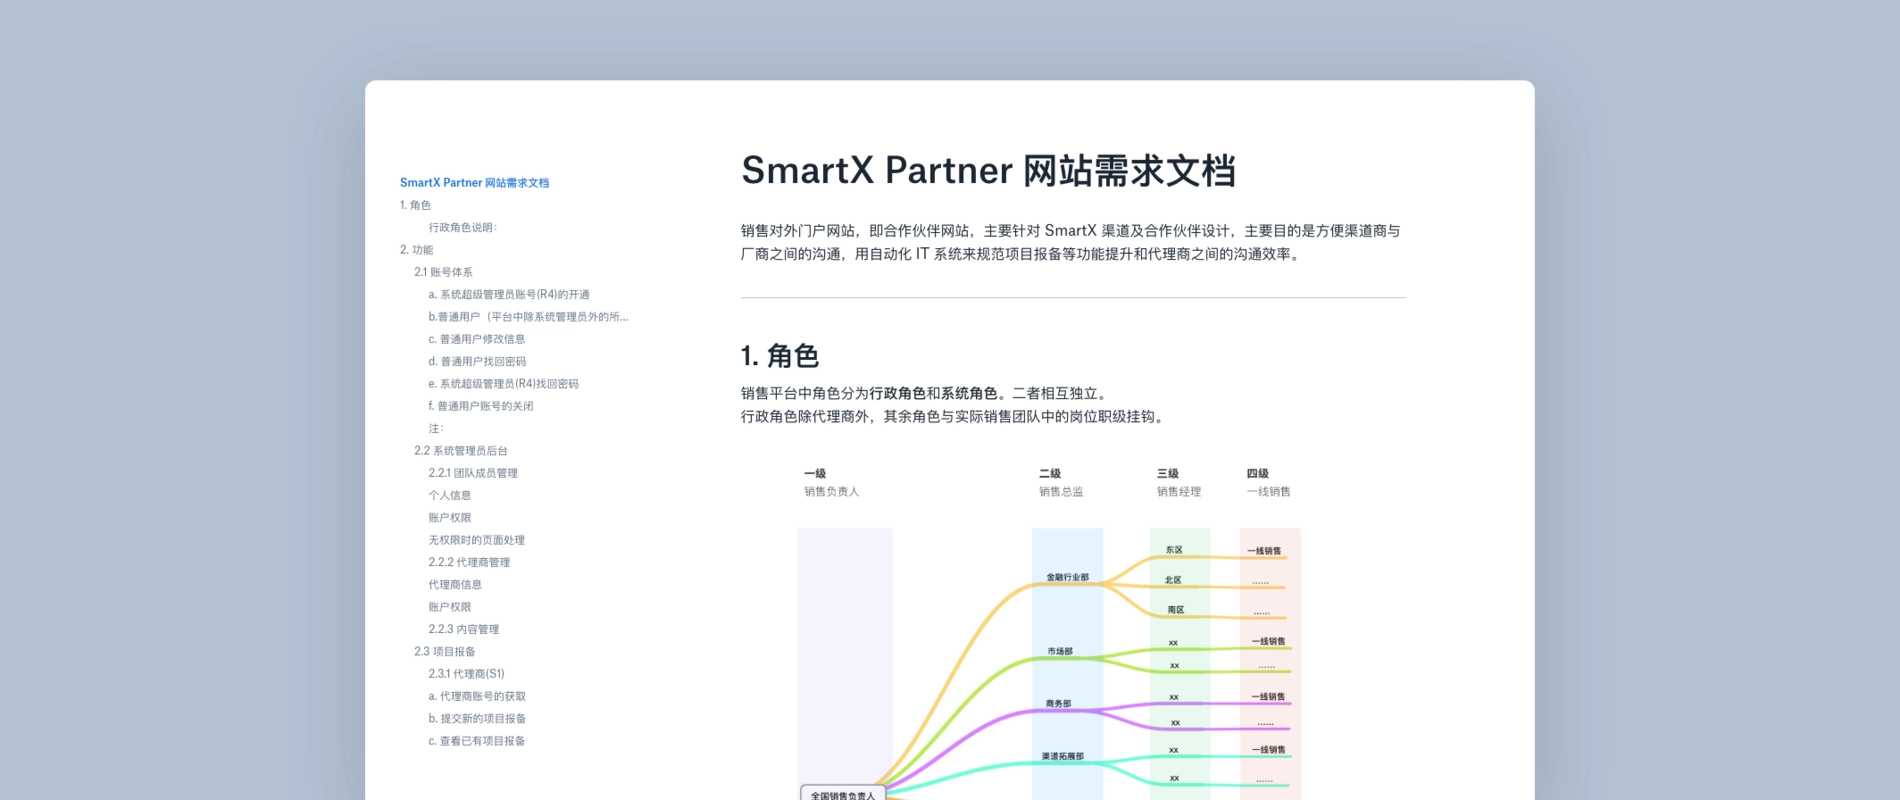
PRD: We wrote this in collaboration with client on Paper. It defined all kinds of users and functional requirements.
User flows: We made user flows of main features and got feedback from client.
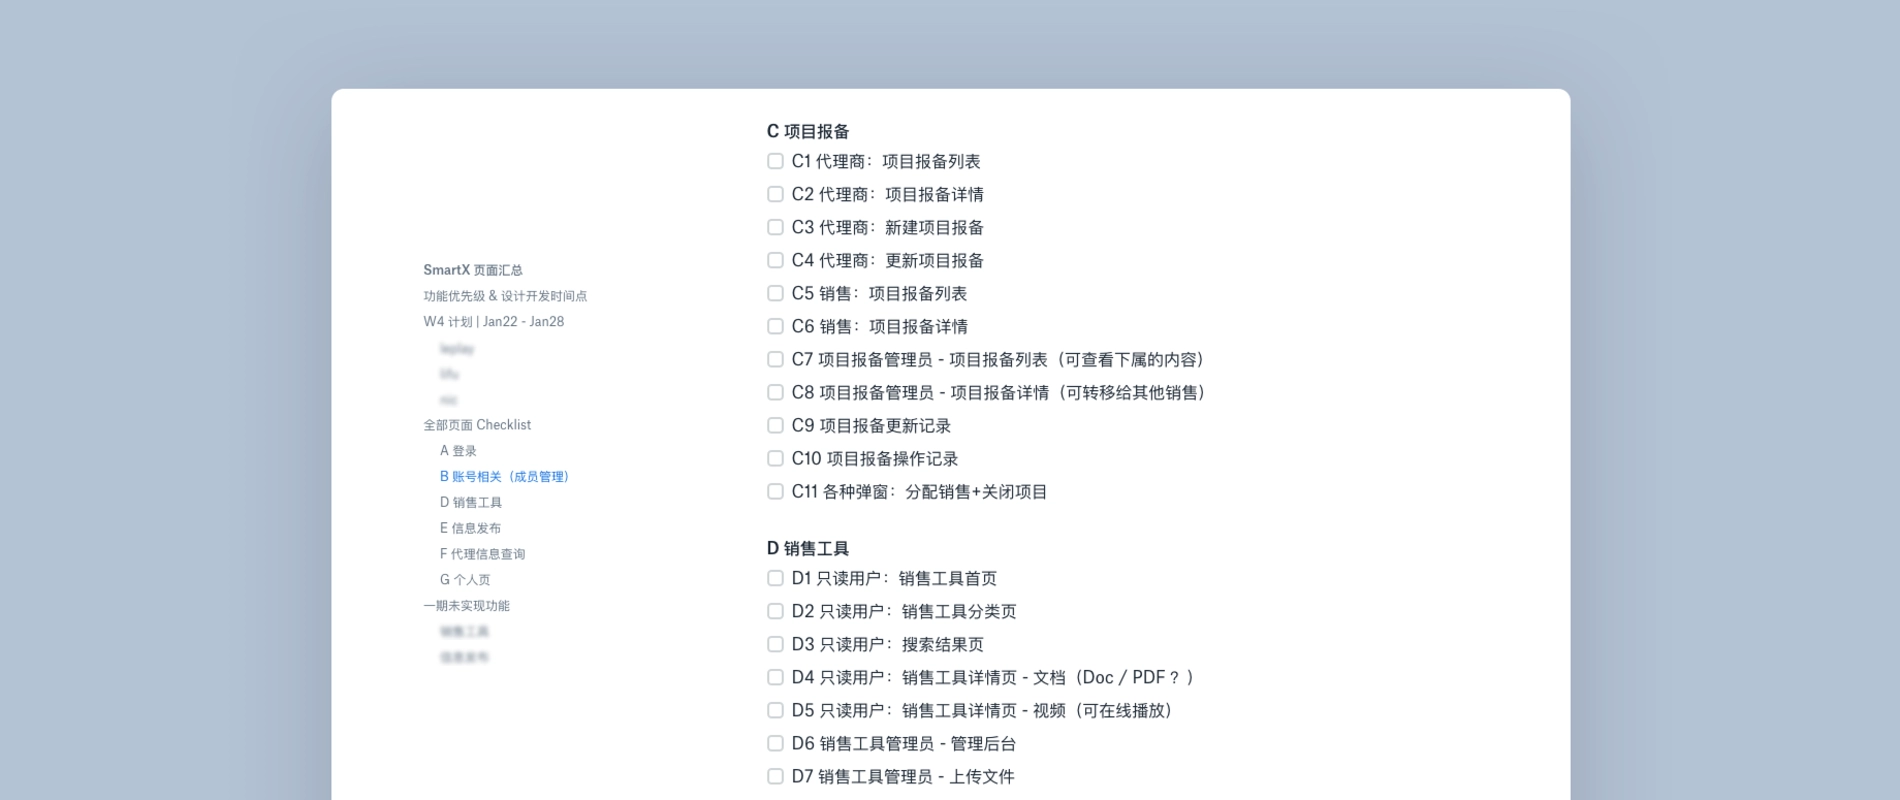
Page lists: We broke down the whole product into 8 modules. Then I made a list of all pages I need to design based on PRD and user flows.
4. Design exploration
Finally, we entered the design part. In this step, I worked on exploring visual styles and interaction design pattern.
I designed some concept pages and components of the product and I categorized them into different solutions. Then I built simple prototypes on Invision and share these solutions with clients.
After few rounds of iteration, we knew our design direction.
Visual design
We want to align the style with client's brand and create a consistent brand identity. So we brought some design elements and patterns from their website and products.
Interaction design
We focused on finding the most productive components, including navigation, layout and table design. We used Invision to collaborate with client and gathered their feedback.
Design exploration: login page.
Design exploration: home and members page.
Solution
1. Accounts & Permissions
Setting up accounts was the first step of building the product. Considering the efficiency of manage members and receive notifications, we chose the work email as the login method. All accounts would be created and managed by the administrator.
- Administrator account: Created by default, assigned to the head of sales.
- Team members' accounts: Created by the administrator. After adding a member's email into the system, he/she would receive an email, then he/she can setting up password by clicking the URL in the email.
- Partners' accounts: Partners chose an employee as the contact, then administrator would add the contact's work email into the system.
After setting up accounts of different roles, we needed to consider the design of permissions. We untangled this complex problem in these following steps:
1.1 Permissions breakdown
We broke down each role's permission into smallest pieces, then we set three permissions for each feature module: Invisible, Read only and Edit. The administrator could decide member's permission when he created accounts.
We also made a permission for login module: On and Off. For employees who already leave the company, the login permission should be turned off.
1.2 Set up reporting relationship
When administrator create a new account for member, he can choose the direct supervisor of the member by selecting in the form. In this way we could build the tree topology of entire team.
1.3 Default permissions for different departments
Some departments had fixed permissions in the system. In order to make it easier for administrator, we would switch to the default permission setting when he selected member's department.
Set permissions for members
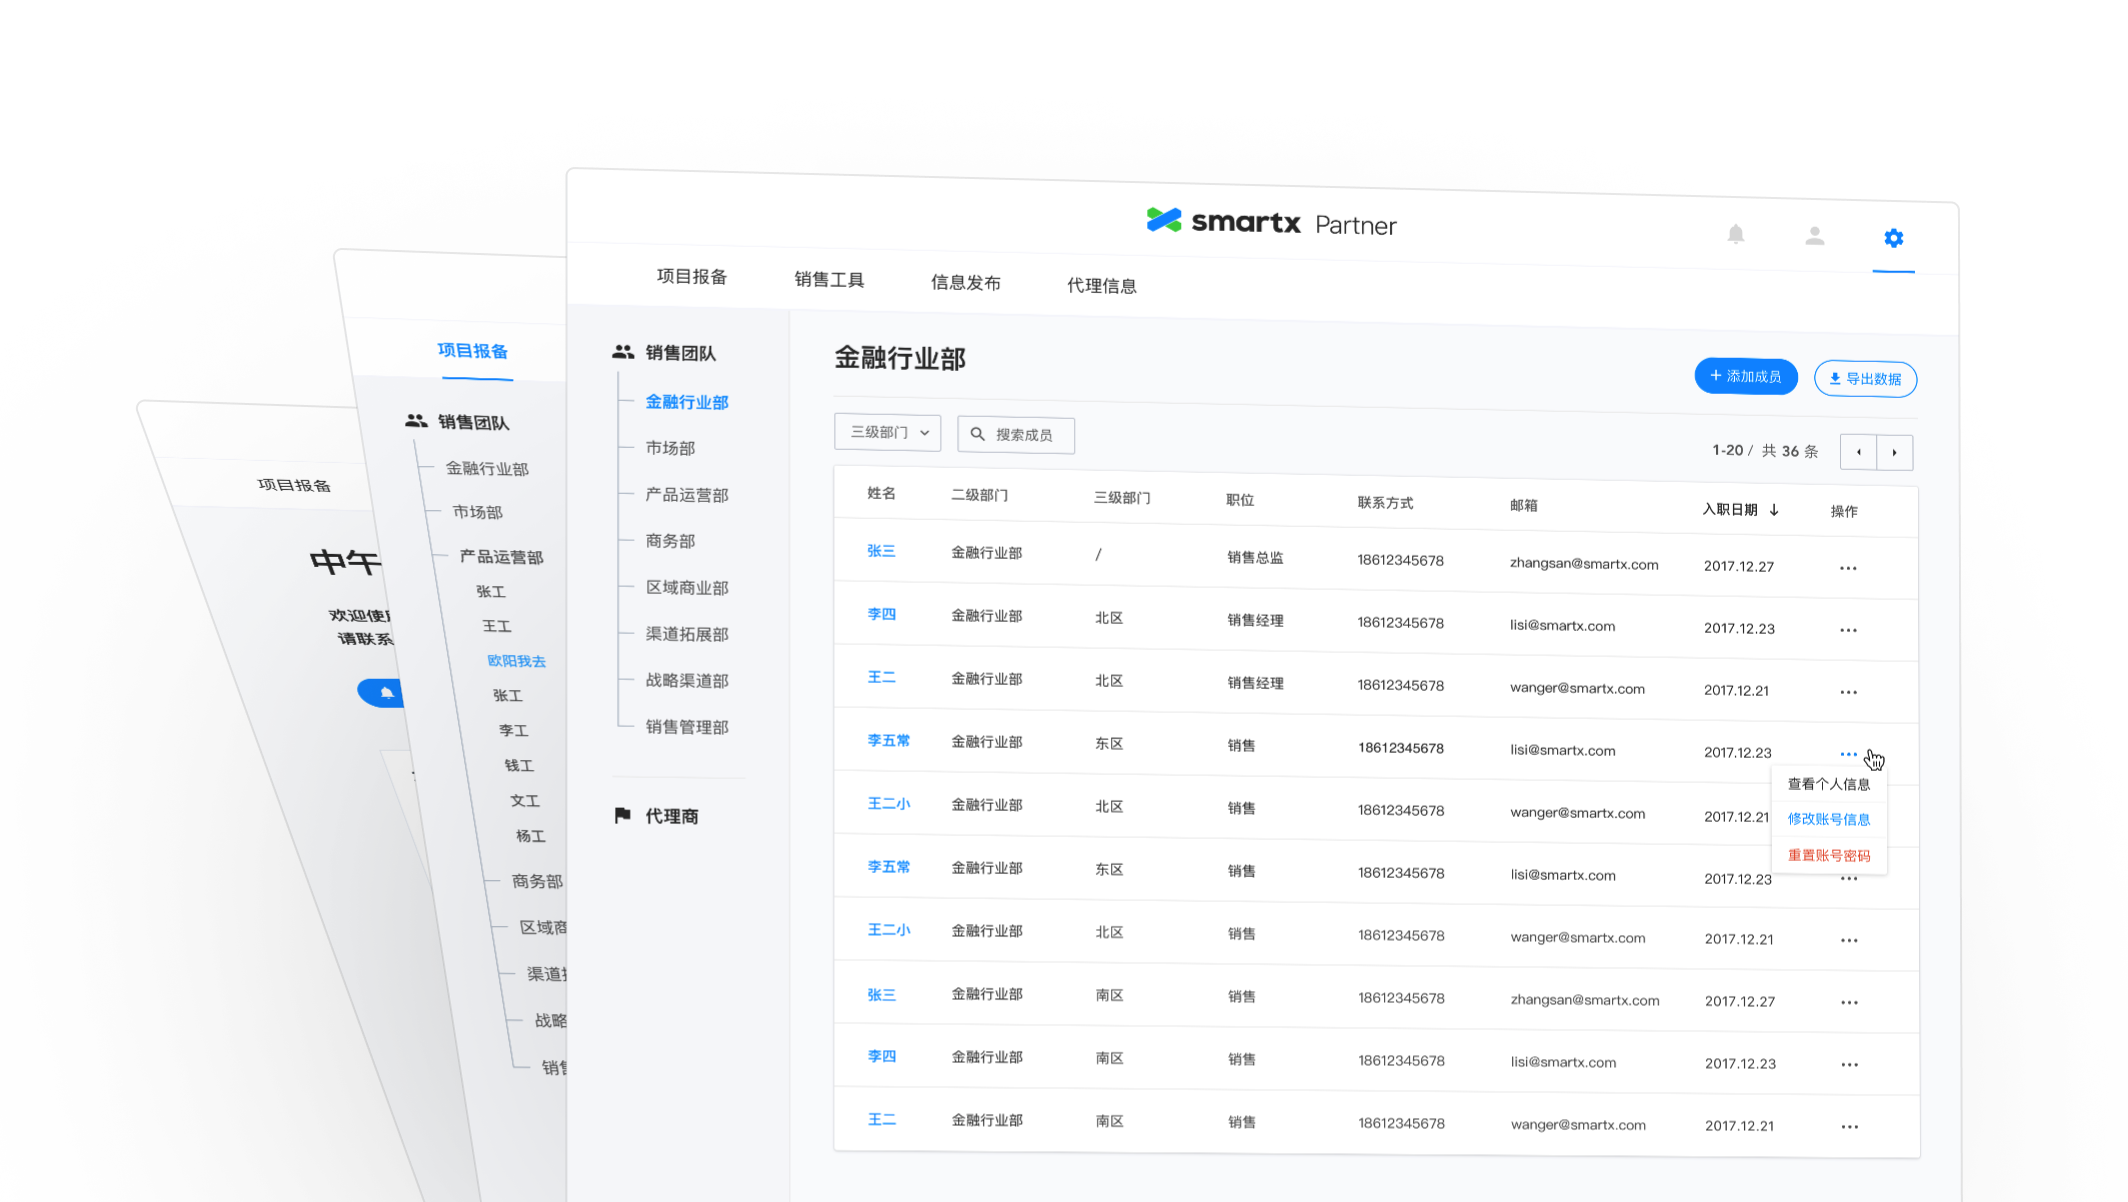
Tree topology design for members with different permissions.
2. Information Architecture
After solving the challenge of accounts and permissions, we began to set up the information architecture for the product.
The main job of this step was designing the navigation. We had several design exploration before, and we gathered some feedback from our client. Considering the scenarios of different roles using the product, we chose the most intuitive and flexible one.
Then we started to design specific feature modules based on the page list I made before. We set up priority for each module. I designed them from high priority to low. When a module was finished, I would share this part with client and developers, ask for their feedback. Then I would fix in the next update. If everyone had no more questions about this part, developers would start to code.
In this way, we can communicate effectively and avoid hidden risks.

Navigation for members with different permissions.
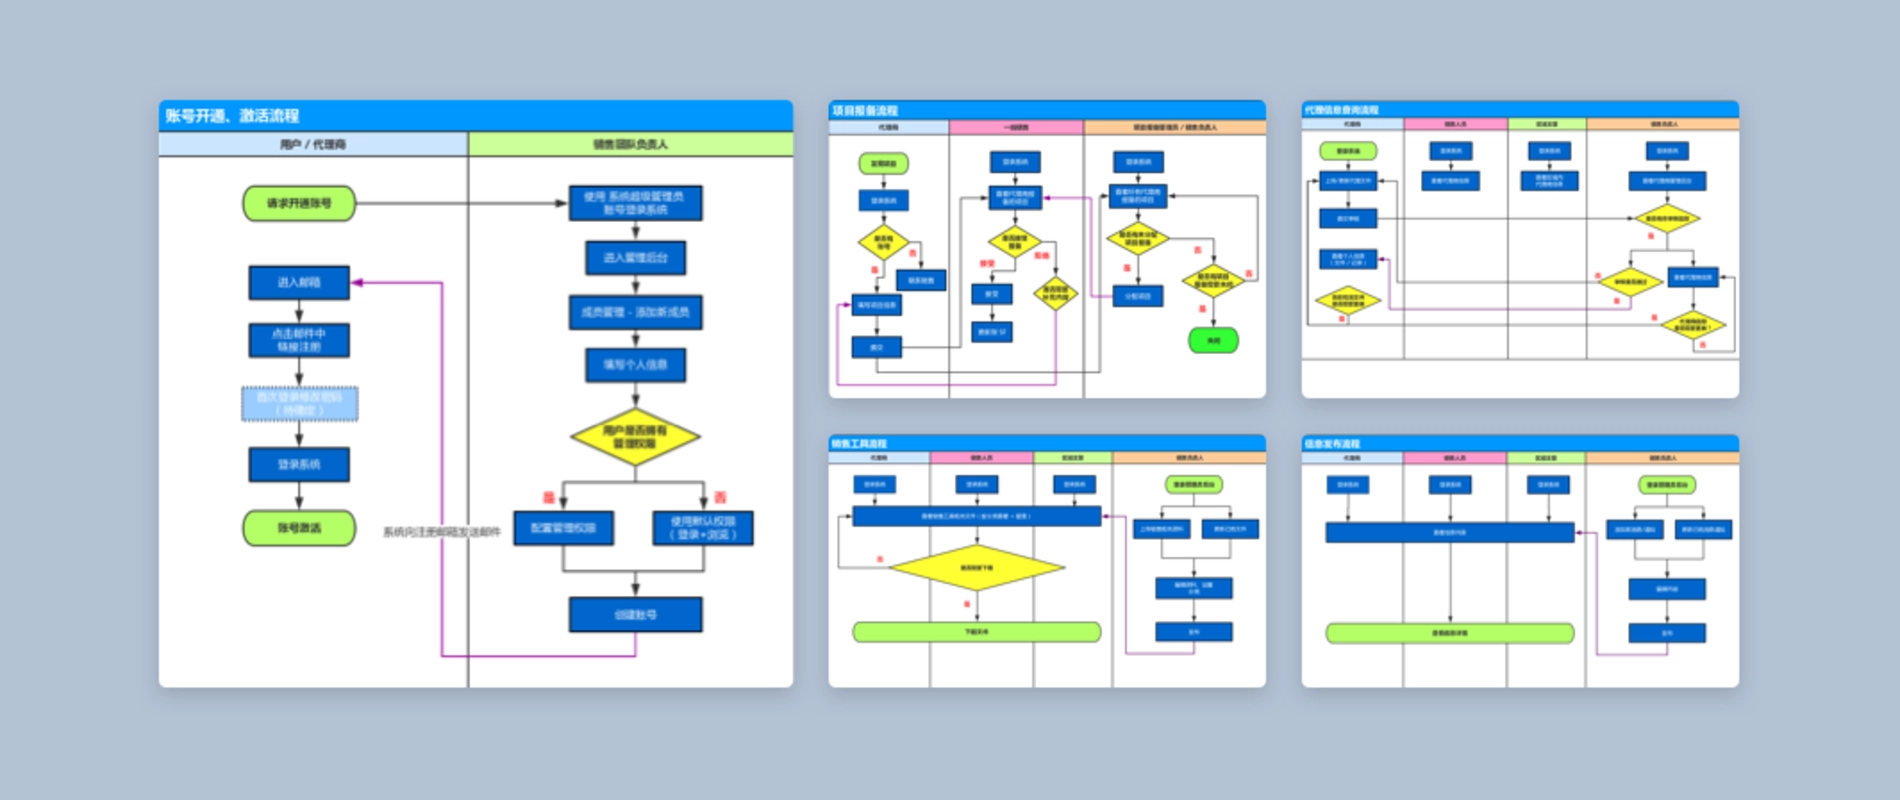
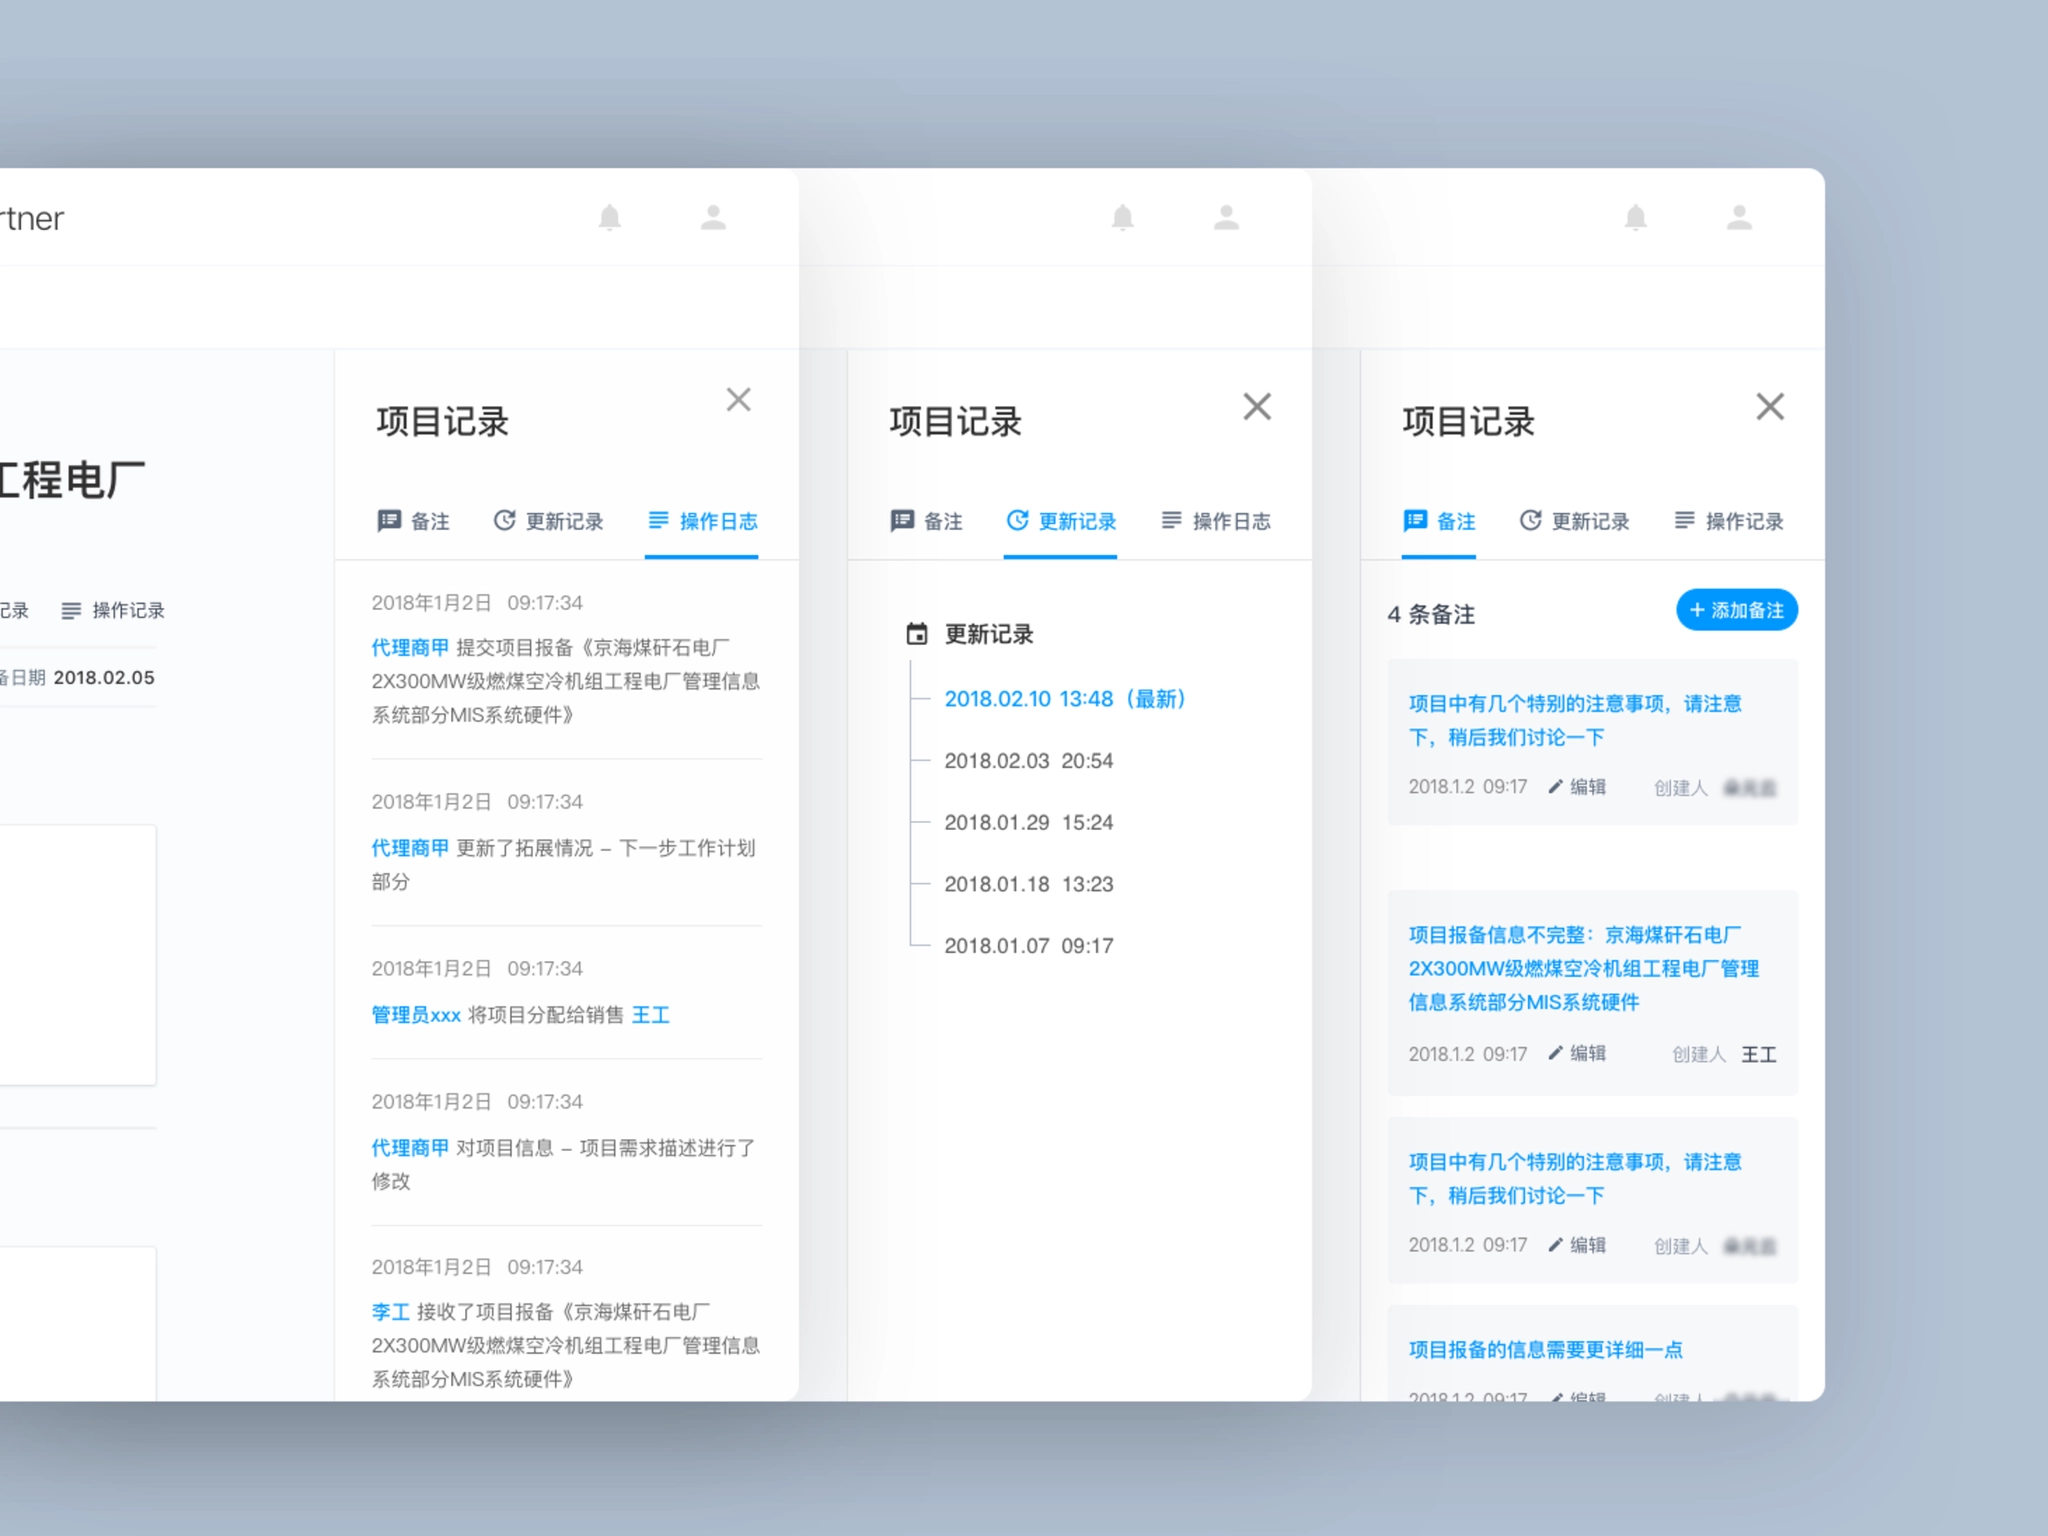
3. Log and version history
In order to track every change happens in the system, we divided the log into two categories: project's log and user's log.
A user's log tracked all the behaviors of this user on the product.
A project's log tracked all changes happen to this project, it usually involved multiple users.
Every piece of log would contain these elements: People, Action, Object(Content), Time. I listed all the log events that needed to be tracked and copy for these events.
3.1 Project version history
Every time members update a project, we will save a new version for this project. By clicking different version's name, users can check the information being modified in this update.
3.2 Project log
Tracking all changes made on this project. Every time members update a project, a log will be generated.
3.3 User log
Tracking all the behaviors of this user on the product.
Log and version history.
4. Notification
Notification was one of the fundamental function of the product. It played a very important role throughout the product. In some way, notification could determine the effectiveness of entire workflow.
We spent a lot of time on designing the form and content of notifications:
- Listed all kinds of notifications on Paper, each notification would contain these elements: Action, Target user, Notification method and copy.
- Prioritized all the notifications and chose the right way to send notifications.
- Wrote copy for each notification.
In order to ensure important notifications won't be missed, we decided to send notifications through these 3 ways.
4.1 Notification page
Display all kinds of notifications.
4.2 Email notification
Only send important notifications via email which need to take action immediately.
4.3 Notification module on homepage
Display unread notifications as a CTA button, to help users check notifications easily.
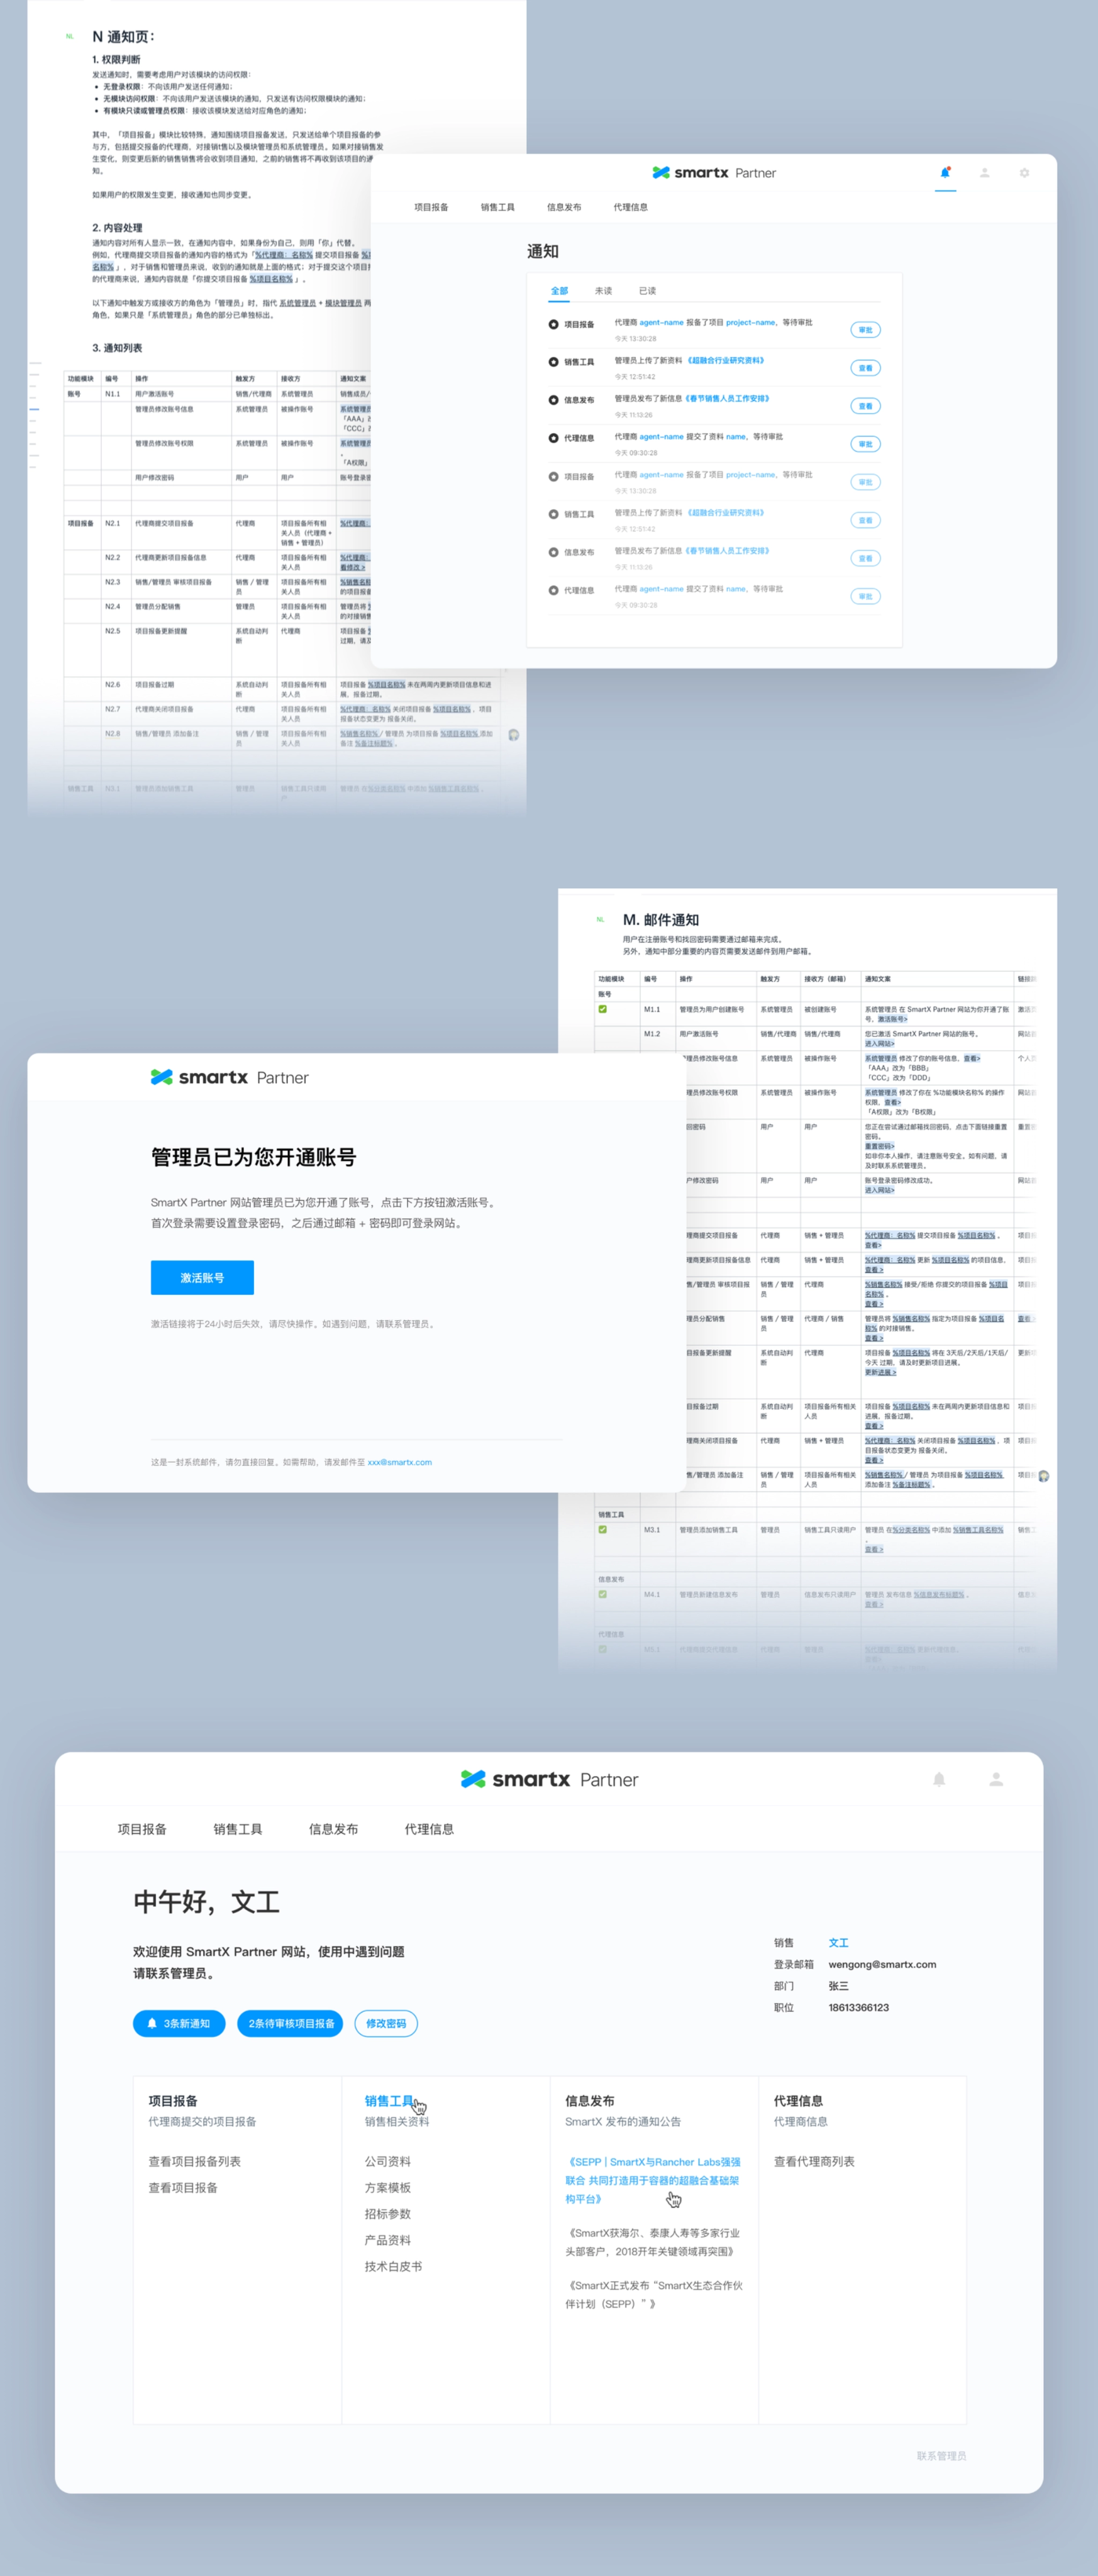
Display notifications across multiple pages.
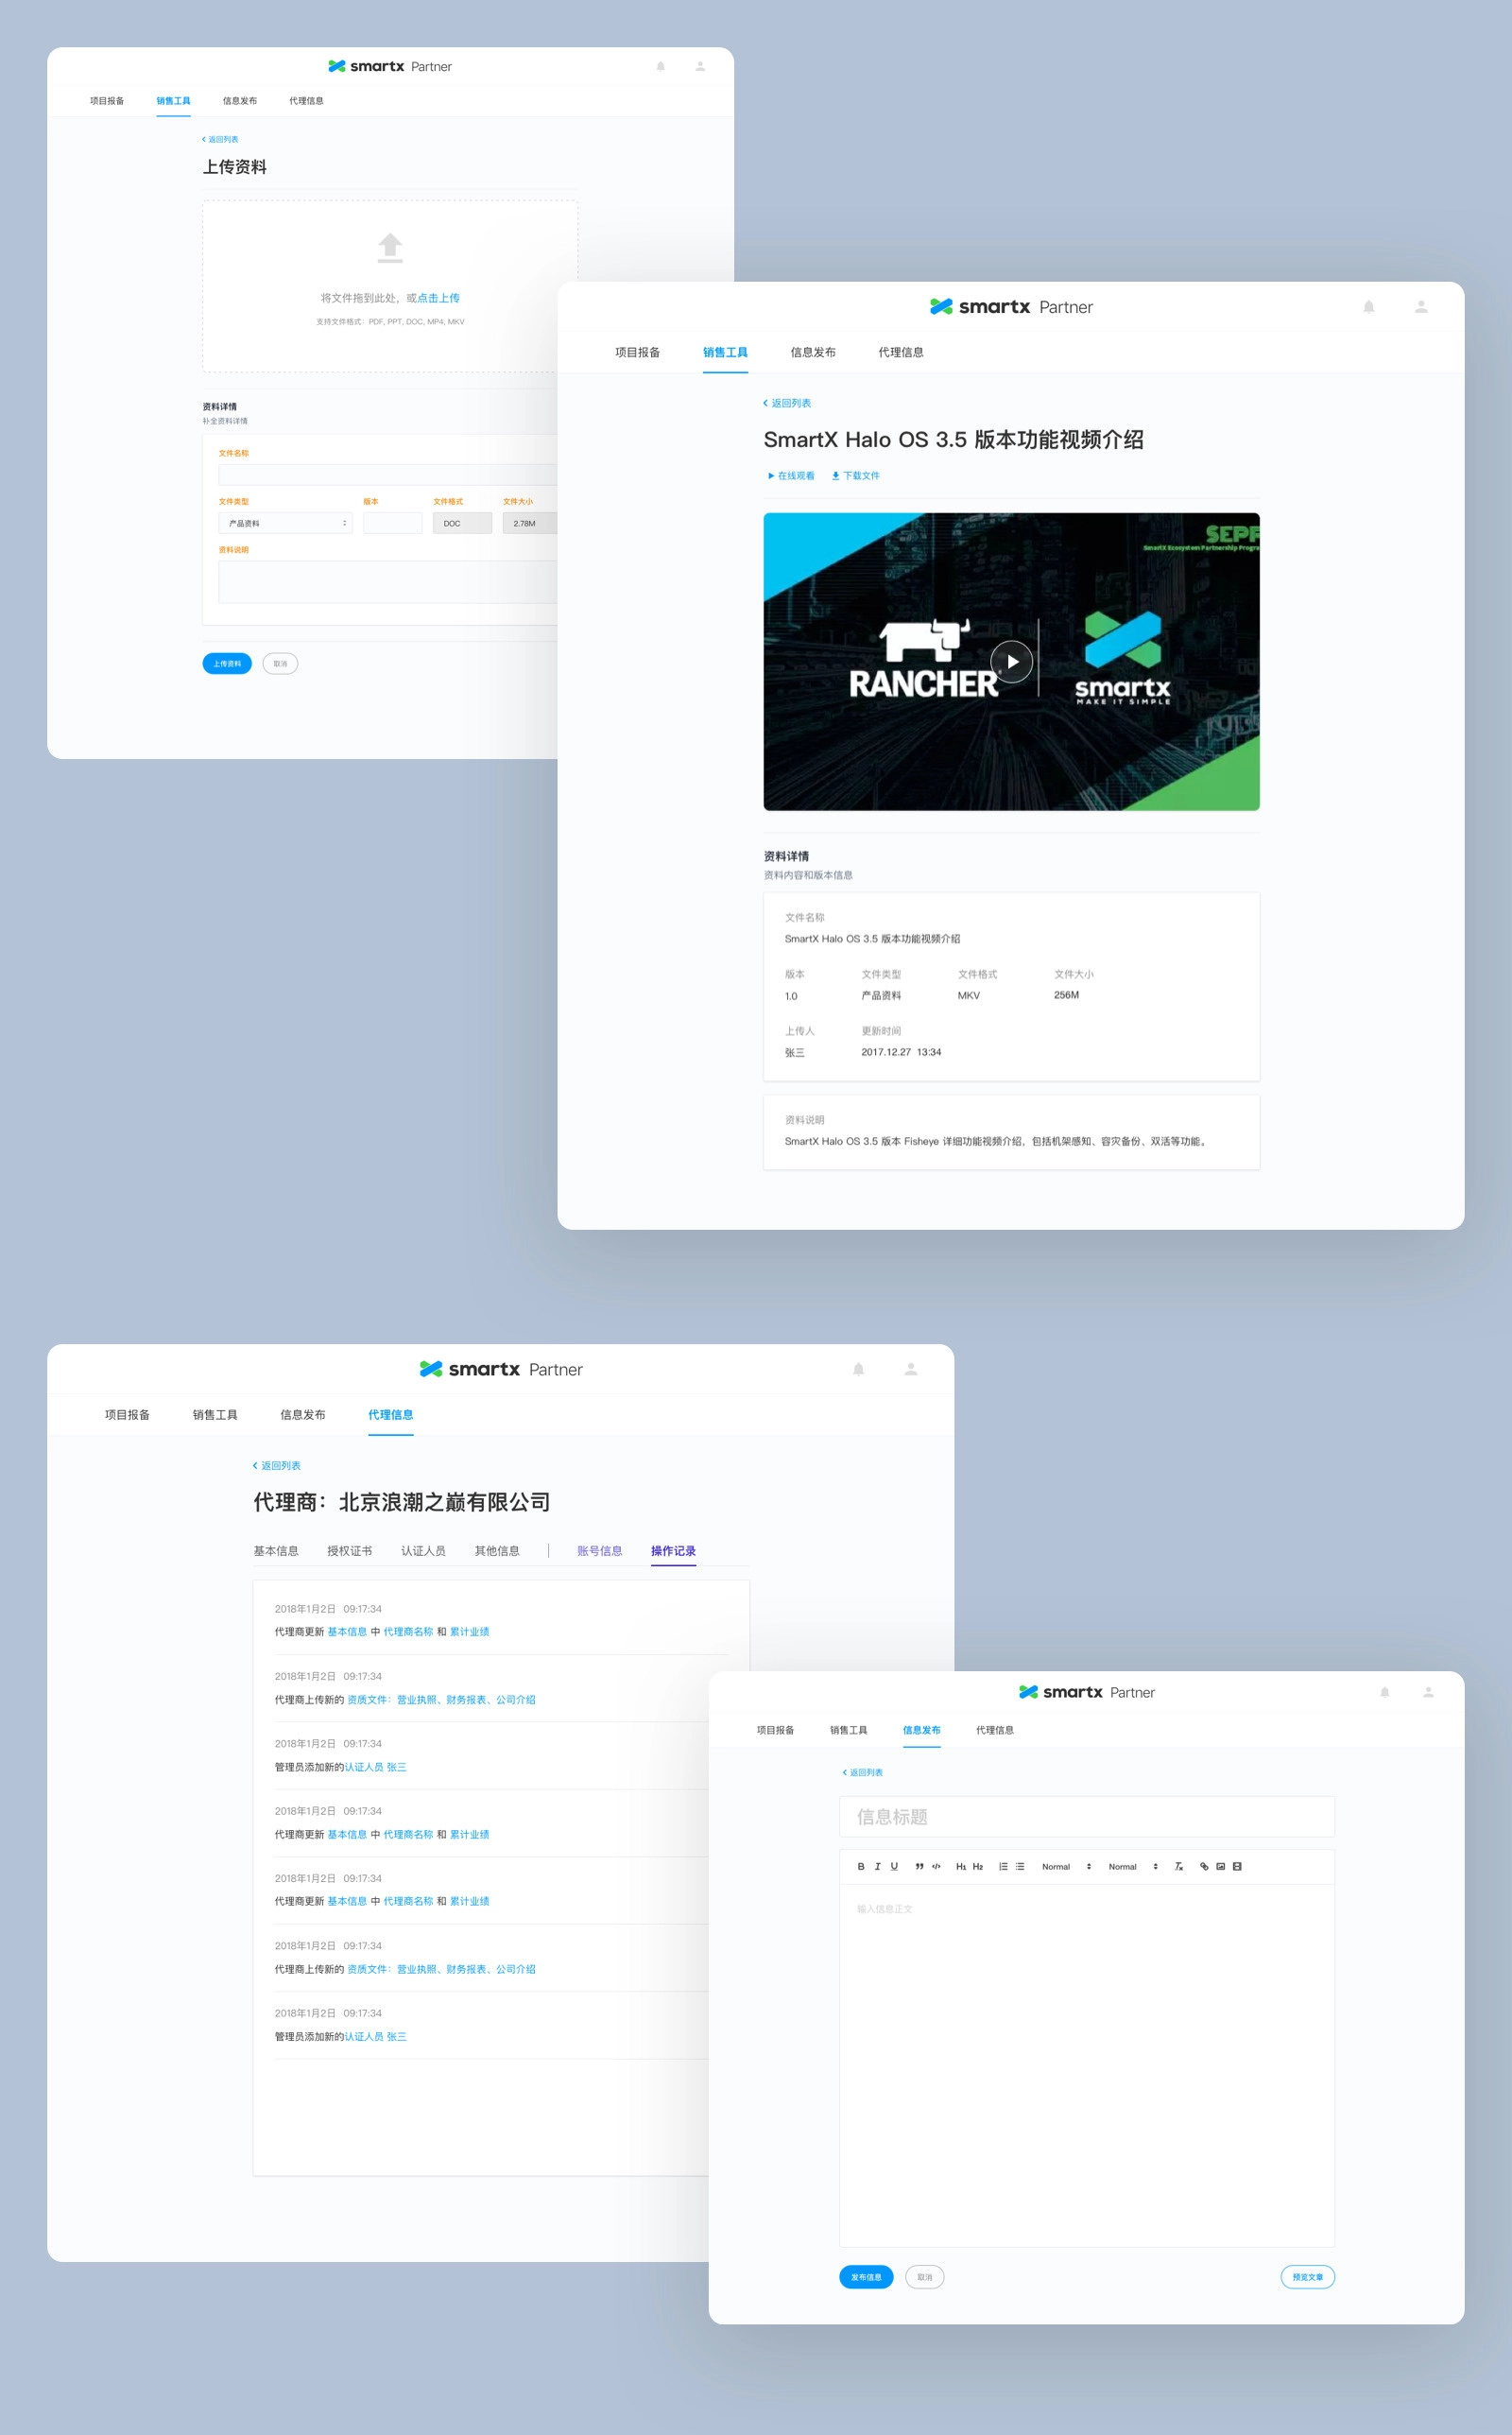
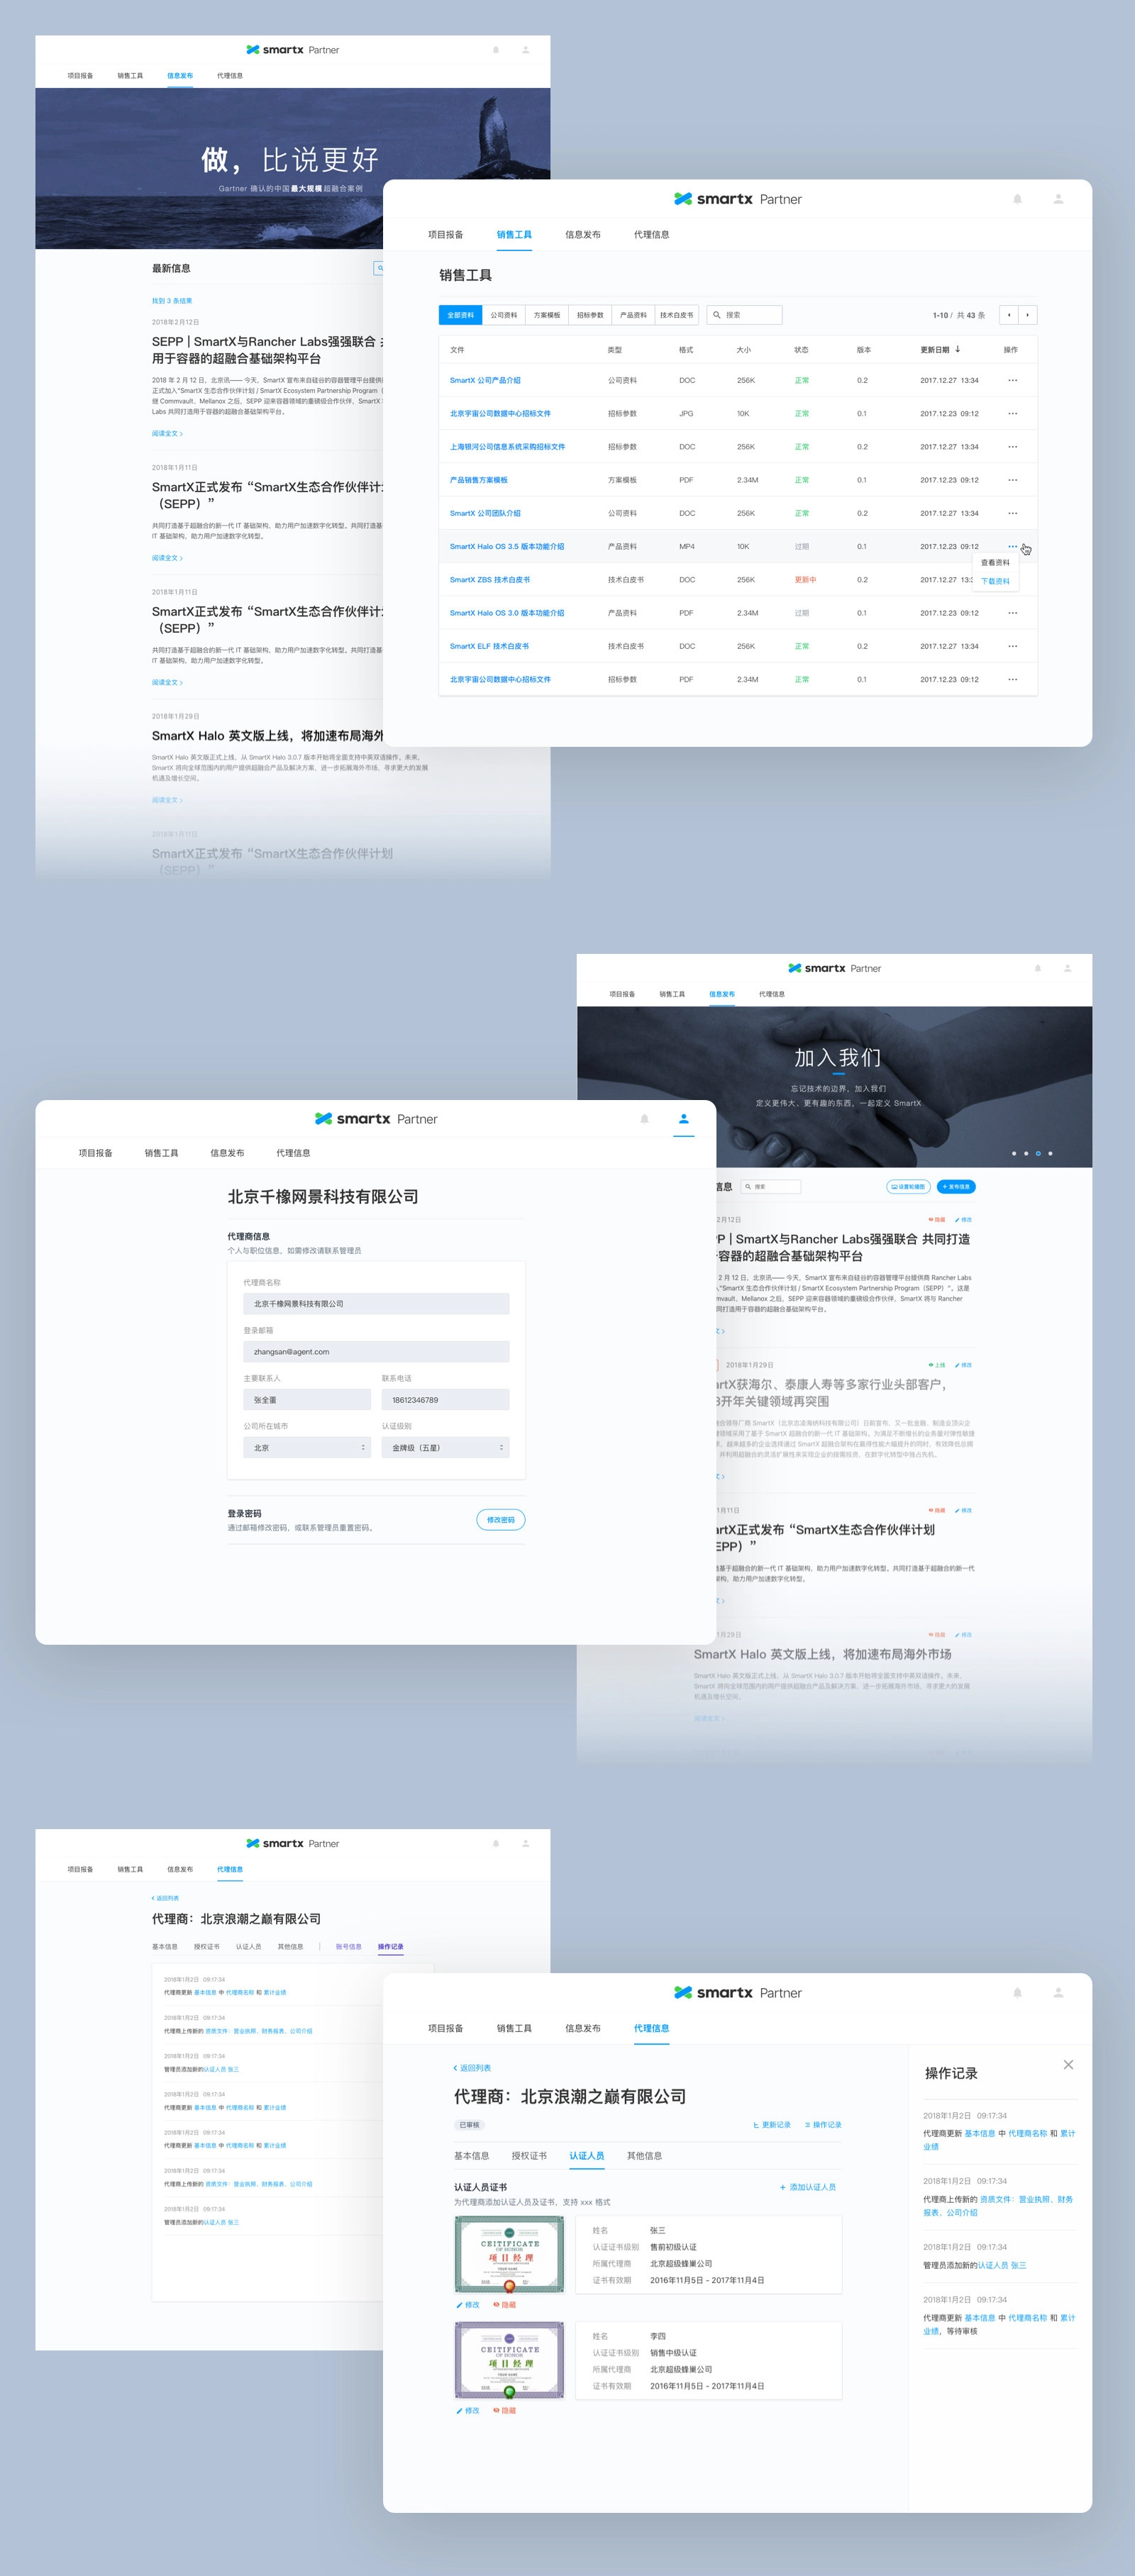
5. Other pages
Things I learned
This project is the most complicated project our studio has ever done. As the only designer, it’s a huge challenge to deal with this large-scale project. In the beginning, I had no clue about where to start. I spent about one month on understanding the problems client was facing, and another month on designing the UI/UX. During the process, I’m not only responsible for delivering all the UI/UX design, but also take the responsibility of product manager and project manager.
Design is not only about being able to design the UI of the product; but also about understanding the product from a business perspective.
Understanding the problems may be the most important part of designing a product.
- UI/UX design is only a small part of entire process.
- Only if you truly understand the problems, good design solutions will come out.
- User research is an effective way to help you understand the problems.
I got a lot of experience in tackling complex problems through this project. It also gives me the confidence to deal with complicated products in the future.
Navigation


Case study
SmartX Partner Portal
Tackling a complex large-scale project.
role
Only designer
Platform
Web
My Contribution
UI / UX Design
Product Management
Project Management
Introduction
SmartX Partner Portal is a web application built for the sales team at SmartX and their partners. It's designed for helping company improve internal and external communication effectiveness. It helped sales team track potential business opportunities and share product and sales resources with partners.
SmartX used Salesforce to track and update business opportunities. Sometimes these business opportunities were found by partners, but they can't submit to the system directly. Although Salesforce can integrate with some tools, but it was not flexible enough to involve external users, such as their partners. So they wanted to build a customized application.
There were also some other problems they want to solve in this customized product.
First, there were some sales resources that were essential to sales and partners, such as contract templates, technical white paper, product specs, etc. The resources used to be stored in employee's laptops or emails. SmartX wanted to gather these resources and put them together on the platform.
Second, SmartX needed a newsroom to post some news about sales policy, new released products or new case studies.
Third, SmartX wanted to build a profile page for partners, where partners can update their info, get certification from SmartX.
So they reached out to us with a plan to solve these problems.
100+ Pages: Splitted the project into 8 modules. Delivered more than 100 final design pages in total.
10+ Docs: Wrote more than 10 docs, including PRD, test cases, notification and log copy, UI walk through, etc.

Challenges
Although our client already had a plan to develop four features, we still need to think about it systematically. And we tried to find out how these features should be organized together and what were the hidden problems.
After doing initial researches on similar SaaS tools, we found that we were not only facing some common challenges of SaaS tools, but also some particular challenges of this customized product.
Here were four main challenges we were facing:
1. It involved multiple roles and wickedly complex permissions.
SmartX Partner Portal would be used by both internal users (sales team) and external users (partners). These two kinds of users played different roles in the product, they had different permissions and user flows.
Inside the sales team, there were multiple hierarchies. The team was divided into several departments and sections based on industries and locations. We needed to bring these hierarchies on the web app. By doing that, managers could able to check projects and manage members by departments; leaders also could visit projects belong to their subordinate staff.
Here were the specific requirements about permissions:
- All accounts should be created and managed by head of sales team.
- Members and projects should be organized by departments;
- The managers of a department could visit projects belong to department members.
- Leaders could visit projects belong to their subordinate staff.
- The head of sales could visit logs and projects of all members.
- The permission of partners were limited, they couldn't visit some internal features.
Departments and roles involved in partner portal.
2. It had multiple modules and each module had a complex user flow.
There were four modules about above features. Besides that, there were other fundamental modules, such as account, notification, profile module, etc.
With the involvement of different roles, the product's complexity increased enormously. For example, different roles would have different user flows and interfaces under the same feature.
Business opportunities management
It allows authorized distributors to submit business opportunities to the sales team, then one salesman from the team will follow up, and decide to accept it or request further information.
Sales resources
Business documents used by sales team and distributors, including contract templates, technical white paper, product specs, etc.
Partner profile
Every distributor will have a profile. They need to update their information about company and contact details.
SmartX can provide certification for qualified distributors.
Newsroom
A place to post news about company, new released products, sales policy or new case studies.
3. It had tons of data.
A project contained lots of data, and more data would be generated when this project being modified or updated.
These data generated on the application were seriously important for client, they had a high standard about keeping these data:
- Each action of members and partners should be recorded.
- Each change to a project should be recorded in order to track or rollback.
- Data should be backed up every day.
4. It required a fast and reliable notification function.
Each project would involve at least two members. For example, distributors submitted a business opportunity to the sales team, then one member at sales team will follow up.
The status of a project would be changed frequently, when this happened, everyone related to this project should be notified so that they could take actions immediately. Notification is also a fundamental function to make the system work smoothly and seamlessly.
Design Process
Before we dived into the "design" job, we spent about 3 weeks on doing user researches. We believe that we can only come up with good design solutions when truly understand client's problems.
1. Understand the problems.
Understanding problems is the prerequisite of finding solutions, and we started from understanding users and brand.
The product would be used by both internal users and external users. After making several calls with client, we made a list about all the roles involved in and their permissions. The list included distributors, sales, managers of each department and employees who had resigned.
Then we started to do some researches about client's brand by visiting their website and getting hands on their products. We tried to figure out the "feeling" they want to express through the product. After we had a conversation with head of sales about their thoughts on the product's "style", we knew we were going to design a clean but professional product, also aligned with SmartX brand.
Roles and corresponding permissions included in partner websites.
2. Research
After we had a clear thought about users of the product, we tried to dig deeper. So we spent a lot of time on doing researches, including several rounds of 1:1 interviews and competitive research.
1:1 interviewsWe conducted several rounds of interviews with employees and managers on the sales team. Some of them were interviewed on the phone and others were interviewed in person at their office. We asked questions about:
- their current workflow.
- what were they struggling with?
- how did they collaborate with partners?
- the life cycle of a business opportunity.
- the sales resources that be used in their daily work?
- what were they looking for in the new product?
- ...
Competitive researchWe also did some competitive researches on similar SaaS tools and other products with same features.
- What were the solutions these products provide? What were the pros and cons of them?
- How did these products solve the challenges we were facing? Especially on setting up account and permissions.
- What was the best solution to specific feature? For example, when we did research on project log and version history, we extended our research to popular document tools including Google Docs and Dropbox Paper.
3. Analyze
After gathering enough information we need, we started to analyze them and turned them into insights. We chose online collaboration document and invited client to join in. By doing that, we could get immediate feedback from them and avoid mistakes.
We had 3 main outcomes in this step: PRD, User flows of main features and a list of all pages I need to design later.
PRD: We wrote this in collaboration with client on Paper. It defined all kinds of users and functional requirements.
User flows: We made user flows of main features and got feedback from client.
Page lists: We broke down the whole product into 8 modules. Then I made a list of all pages I need to design based on PRD and user flows.
4. Design exploration
Finally, we entered the design part. In this step, I worked on exploring visual styles and interaction design pattern.
I designed some concept pages and components of the product and I categorized them into different solutions. Then I built simple prototypes on Invision and share these solutions with clients.
After few rounds of iteration, we knew our design direction.
Visual design
We want to align the style with client's brand and create a consistent brand identity. So we brought some design elements and patterns from their website and products.
Interaction design
We focused on finding the most productive components, including navigation, layout and table design. We used Invision to collaborate with client and gathered their feedback.
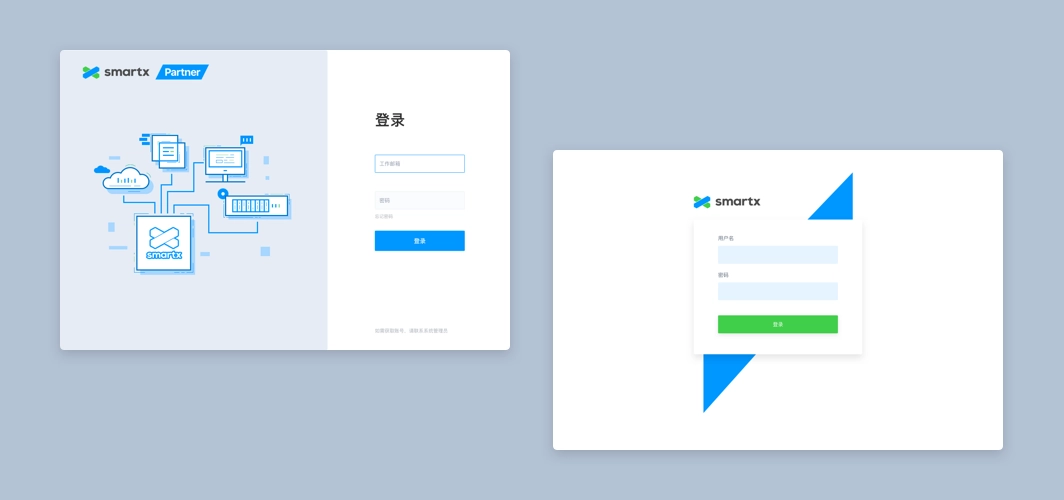
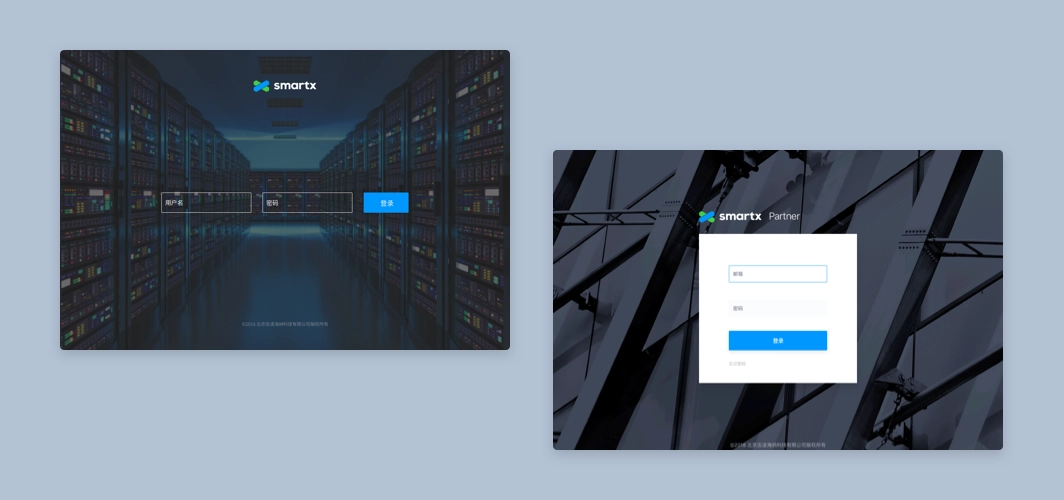
Design exploration: login page.
Design exploration: home and members page.
Solution
1. Accounts & Permissions
Setting up accounts was the first step of building the product. Considering the efficiency of manage members and receive notifications, we chose the work email as the login method. All accounts would be created and managed by the administrator.
- Administrator account: Created by default, assigned to the head of sales.
- Team members' accounts: Created by the administrator. After adding a member's email into the system, he/she would receive an email, then he/she can setting up password by clicking the URL in the email.
- Partners' accounts: Partners chose an employee as the contact, then administrator would add the contact's work email into the system.
After setting up accounts of different roles, we needed to consider the design of permissions. We untangled this complex problem in these following steps:
1.1 Permissions breakdown
We broke down each role's permission into smallest pieces, then we set three permissions for each feature module: Invisible, Read only and Edit. The administrator could decide member's permission when he created accounts.
We also made a permission for login module: On and Off. For employees who already leave the company, the login permission should be turned off.
1.2 Set up reporting relationship
When administrator create a new account for member, he can choose the direct supervisor of the member by selecting in the form. In this way we could build the tree topology of entire team.
1.3 Default permissions for different departments
Some departments had fixed permissions in the system. In order to make it easier for administrator, we would switch to the default permission setting when he selected member's department.
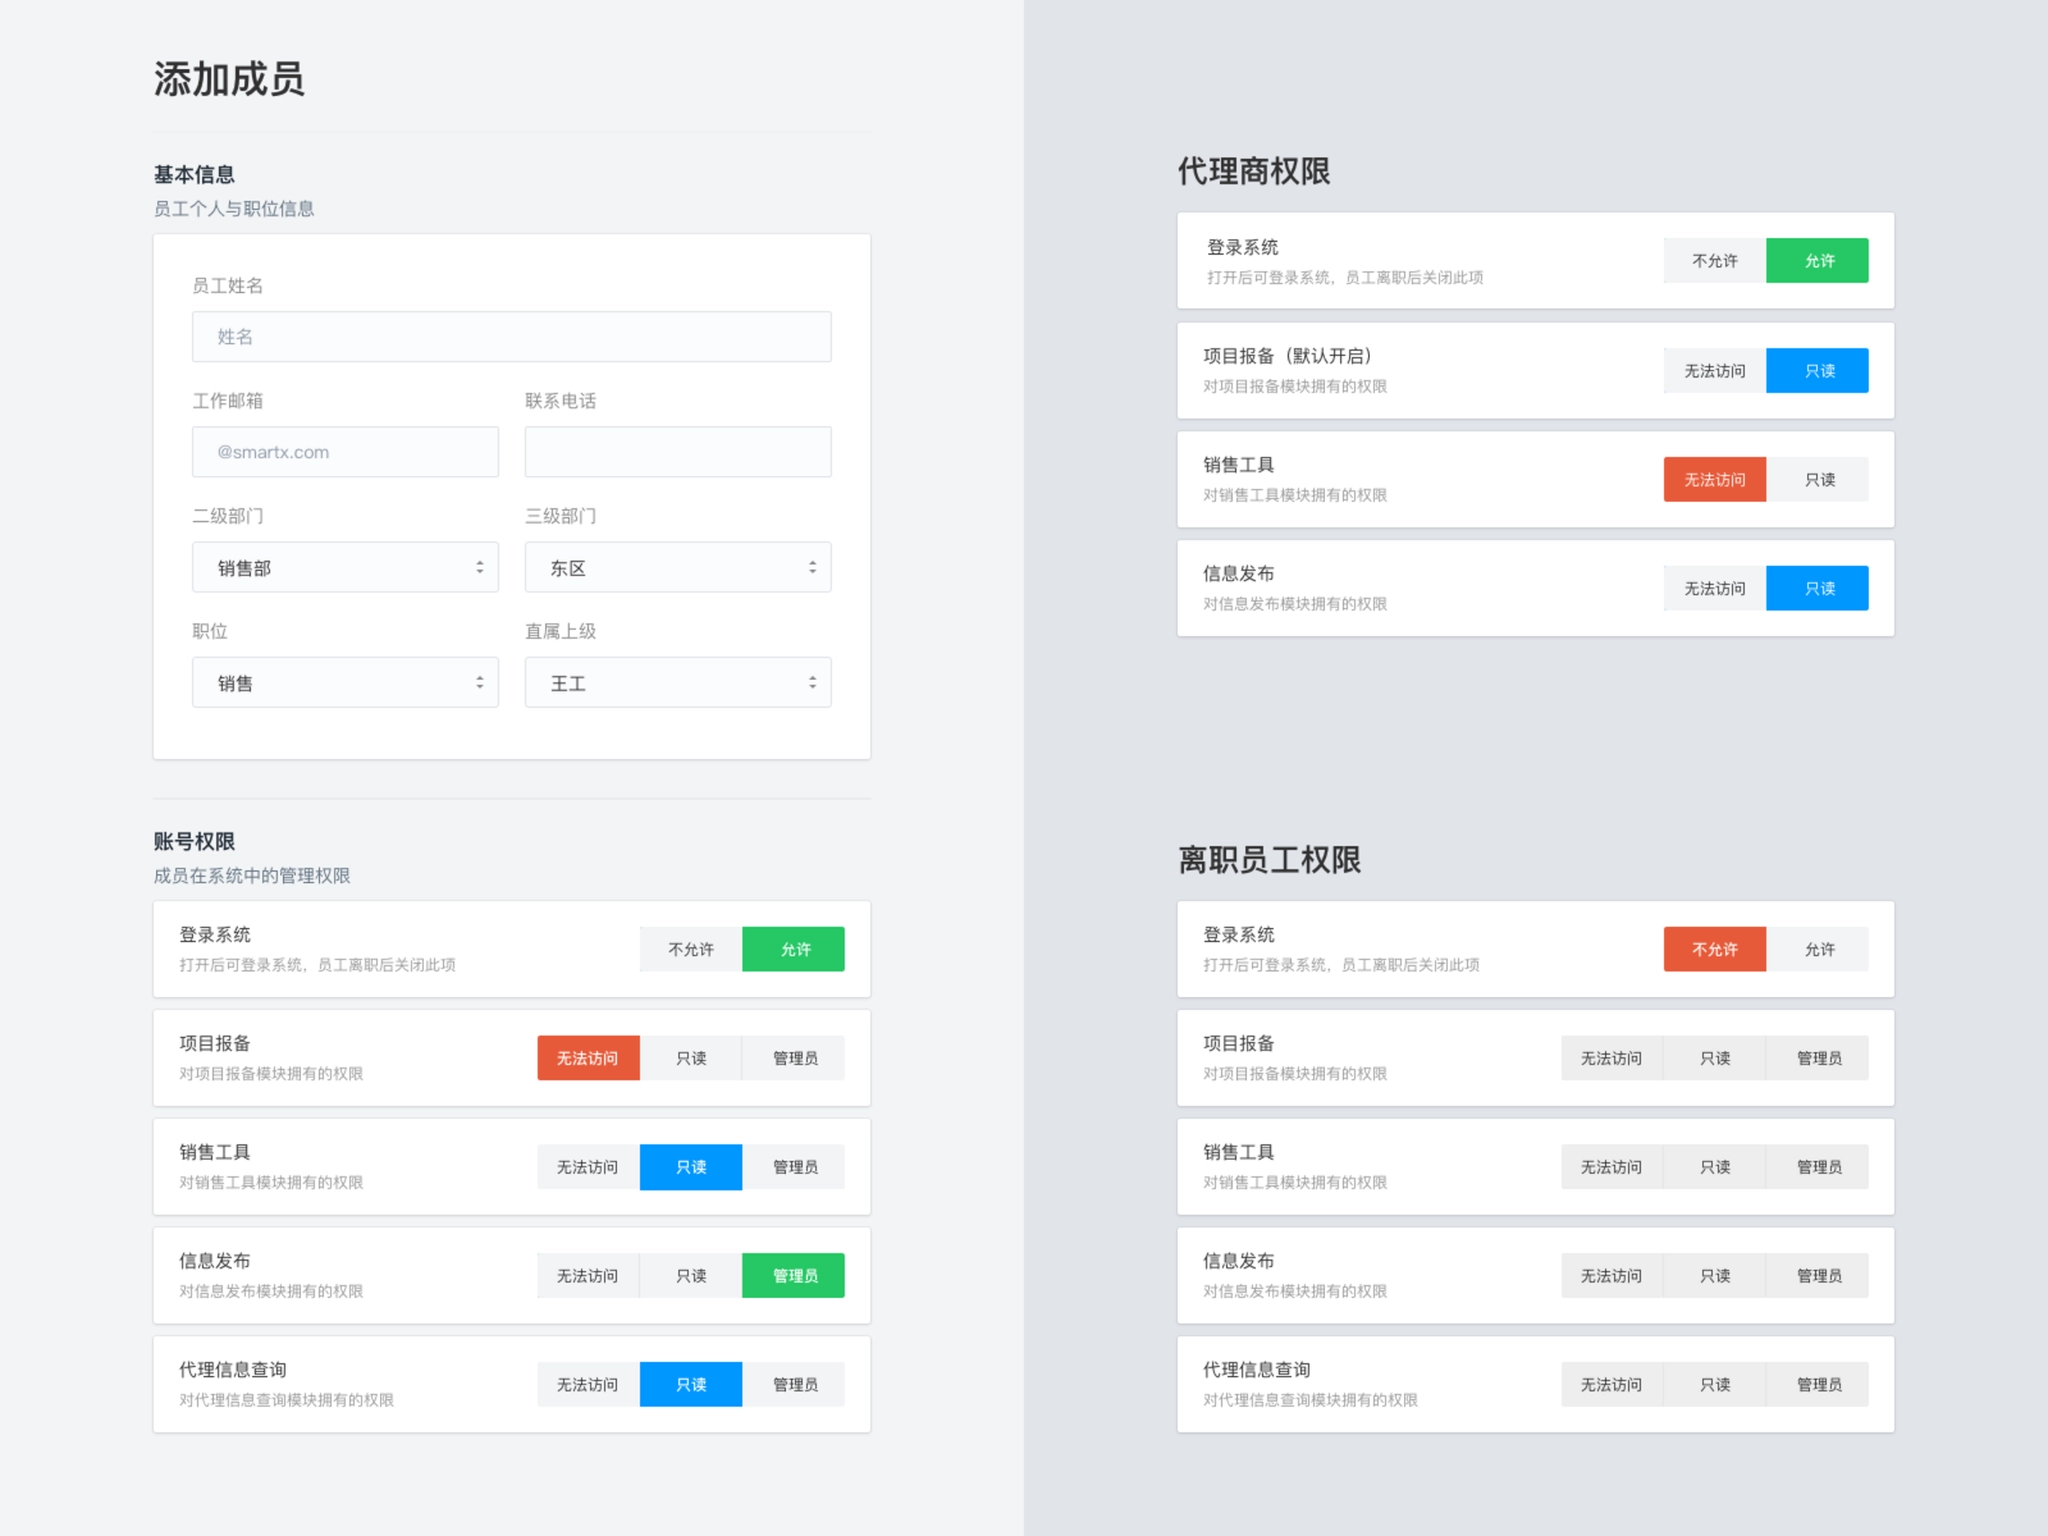
Set permissions for members
Tree topology design for members with different permissions.
2. Information Architecture
After solving the challenge of accounts and permissions, we began to set up the information architecture for the product.
The main job of this step was designing the navigation. We had several design exploration before, and we gathered some feedback from our client. Considering the scenarios of different roles using the product, we chose the most intuitive and flexible one.
Then we started to design specific feature modules based on the page list I made before. We set up priority for each module. I designed them from high priority to low. When a module was finished, I would share this part with client and developers, ask for their feedback. Then I would fix in the next update. If everyone had no more questions about this part, developers would start to code.
In this way, we can communicate effectively and avoid hidden risks.
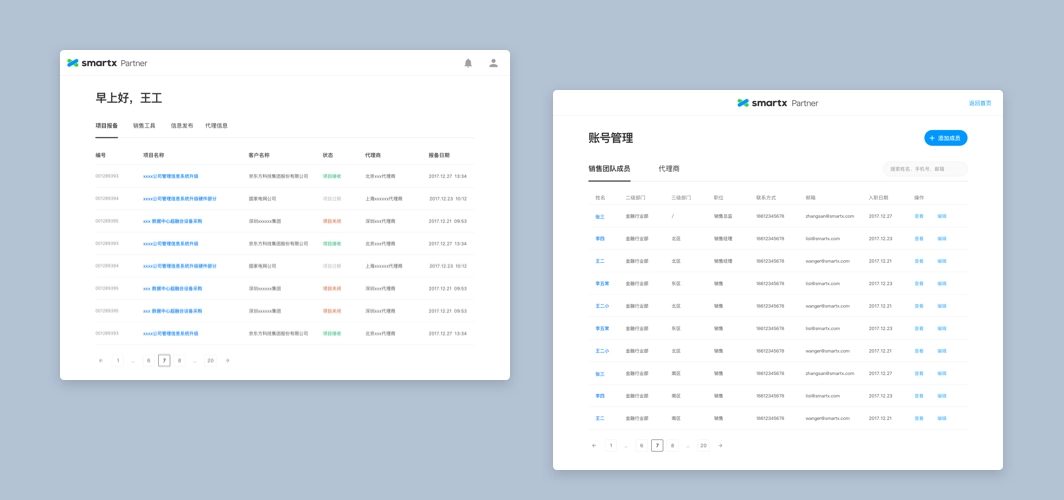
Navigation for members with different permissions.
3. Log and version history
In order to track every change happens in the system, we divided the log into two categories: project's log and user's log.
A user's log tracked all the behaviors of this user on the product.
A project's log tracked all changes happen to this project, it usually involved multiple users.
Every piece of log would contain these elements: People, Action, Object(Content), Time. I listed all the log events that needed to be tracked and copy for these events.
3.1 Project version history
Every time members update a project, we will save a new version for this project. By clicking different version's name, users can check the information being modified in this update.
3.2 Project log
Tracking all changes made on this project. Every time members update a project, a log will be generated.
3.3 User log
Tracking all the behaviors of this user on the product.
Log and version history.
4. Notification
Notification was one of the fundamental function of the product. It played a very important role throughout the product. In some way, notification could determine the effectiveness of entire workflow.
We spent a lot of time on designing the form and content of notifications:
- Listed all kinds of notifications on Paper, each notification would contain these elements: Action, Target user, Notification method and copy.
- Prioritized all the notifications and chose the right way to send notifications.
- Wrote copy for each notification.
In order to ensure important notifications won't be missed, we decided to send notifications through these 3 ways.
4.1 Notification page
Display all kinds of notifications.
4.2 Email notification
Only send important notifications via email which need to take action immediately.
4.3 Notification module on homepage
Display unread notifications as a CTA button, to help users check notifications easily.
Display notifications across multiple pages.
5. Other pages
Things I learned
This project is the most complicated project our studio has ever done. As the only designer, it’s a huge challenge to deal with this large-scale project. In the beginning, I had no clue about where to start. I spent about one month on understanding the problems client was facing, and another month on designing the UI/UX. During the process, I’m not only responsible for delivering all the UI/UX design, but also take the responsibility of product manager and project manager.
Design is not only about being able to design the UI of the product; but also about understanding the product from a business perspective.
Understanding the problems may be the most important part of designing a product.
- UI/UX design is only a small part of entire process.
- Only if you truly understand the problems, good design solutions will come out.
- User research is an effective way to help you understand the problems.
I got a lot of experience in tackling complex problems through this project. It also gives me the confidence to deal with complicated products in the future.
Navigation


Case study
SmartX Partner Portal
Tackling a complex large-scale project.
role
Only designer
Platform
Web
My Contribution
UI / UX Design
Product Management
Project Management
Introduction
SmartX Partner Portal is a web application built for the sales team at SmartX and their partners. It's designed for helping company improve internal and external communication effectiveness. It helped sales team track potential business opportunities and share product and sales resources with partners.
SmartX used Salesforce to track and update business opportunities. Sometimes these business opportunities were found by partners, but they can't submit to the system directly. Although Salesforce can integrate with some tools, but it was not flexible enough to involve external users, such as their partners. So they wanted to build a customized application.
There were also some other problems they want to solve in this customized product.
First, there were some sales resources that were essential to sales and partners, such as contract templates, technical white paper, product specs, etc. The resources used to be stored in employee's laptops or emails. SmartX wanted to gather these resources and put them together on the platform.
Second, SmartX needed a newsroom to post some news about sales policy, new released products or new case studies.
Third, SmartX wanted to build a profile page for partners, where partners can update their info, get certification from SmartX.
So they reached out to us with a plan to solve these problems.
100+ Pages: Splitted the project into 8 modules. Delivered more than 100 final design pages in total.
10+ Docs: Wrote more than 10 docs, including PRD, test cases, notification and log copy, UI walk through, etc.

Challenges
Although our client already had a plan to develop four features, we still need to think about it systematically. And we tried to find out how these features should be organized together and what were the hidden problems.
After doing initial researches on similar SaaS tools, we found that we were not only facing some common challenges of SaaS tools, but also some particular challenges of this customized product.
Here were four main challenges we were facing:
1. It involved multiple roles and wickedly complex permissions.
SmartX Partner Portal would be used by both internal users (sales team) and external users (partners). These two kinds of users played different roles in the product, they had different permissions and user flows.
Inside the sales team, there were multiple hierarchies. The team was divided into several departments and sections based on industries and locations. We needed to bring these hierarchies on the web app. By doing that, managers could able to check projects and manage members by departments; leaders also could visit projects belong to their subordinate staff.
Here were the specific requirements about permissions:
- All accounts should be created and managed by head of sales team.
- Members and projects should be organized by departments;
- The managers of a department could visit projects belong to department members.
- Leaders could visit projects belong to their subordinate staff.
- The head of sales could visit logs and projects of all members.
- The permission of partners were limited, they couldn't visit some internal features.
Departments and roles involved in partner portal.
2. It had multiple modules and each module had a complex user flow.
There were four modules about above features. Besides that, there were other fundamental modules, such as account, notification, profile module, etc.
With the involvement of different roles, the product's complexity increased enormously. For example, different roles would have different user flows and interfaces under the same feature.
Business opportunities management
It allows authorized distributors to submit business opportunities to the sales team, then one salesman from the team will follow up, and decide to accept it or request further information.
Sales resources
Business documents used by sales team and distributors, including contract templates, technical white paper, product specs, etc.
Partner profile
Every distributor will have a profile. They need to update their information about company and contact details.
SmartX can provide certification for qualified distributors.
Newsroom
A place to post news about company, new released products, sales policy or new case studies.
3. It had tons of data.
A project contained lots of data, and more data would be generated when this project being modified or updated.
These data generated on the application were seriously important for client, they had a high standard about keeping these data:
- Each action of members and partners should be recorded.
- Each change to a project should be recorded in order to track or rollback.
- Data should be backed up every day.
4. It required a fast and reliable notification function.
Each project would involve at least two members. For example, distributors submitted a business opportunity to the sales team, then one member at sales team will follow up.
The status of a project would be changed frequently, when this happened, everyone related to this project should be notified so that they could take actions immediately. Notification is also a fundamental function to make the system work smoothly and seamlessly.
Design Process
Before we dived into the "design" job, we spent about 3 weeks on doing user researches. We believe that we can only come up with good design solutions when truly understand client's problems.
1. Understand the problems.
Understanding problems is the prerequisite of finding solutions, and we started from understanding users and brand.
The product would be used by both internal users and external users. After making several calls with client, we made a list about all the roles involved in and their permissions. The list included distributors, sales, managers of each department and employees who had resigned.
Then we started to do some researches about client's brand by visiting their website and getting hands on their products. We tried to figure out the "feeling" they want to express through the product. After we had a conversation with head of sales about their thoughts on the product's "style", we knew we were going to design a clean but professional product, also aligned with SmartX brand.
Roles and corresponding permissions included in partner websites.
2. Research
After we had a clear thought about users of the product, we tried to dig deeper. So we spent a lot of time on doing researches, including several rounds of 1:1 interviews and competitive research.
1:1 interviewsWe conducted several rounds of interviews with employees and managers on the sales team. Some of them were interviewed on the phone and others were interviewed in person at their office. We asked questions about:
- their current workflow.
- what were they struggling with?
- how did they collaborate with partners?
- the life cycle of a business opportunity.
- the sales resources that be used in their daily work?
- what were they looking for in the new product?
- ...
Competitive researchWe also did some competitive researches on similar SaaS tools and other products with same features.
- What were the solutions these products provide? What were the pros and cons of them?
- How did these products solve the challenges we were facing? Especially on setting up account and permissions.
- What was the best solution to specific feature? For example, when we did research on project log and version history, we extended our research to popular document tools including Google Docs and Dropbox Paper.
3. Analyze
After gathering enough information we need, we started to analyze them and turned them into insights. We chose online collaboration document and invited client to join in. By doing that, we could get immediate feedback from them and avoid mistakes.
We had 3 main outcomes in this step: PRD, User flows of main features and a list of all pages I need to design later.
PRD: We wrote this in collaboration with client on Paper. It defined all kinds of users and functional requirements.
User flows: We made user flows of main features and got feedback from client.
Page lists: We broke down the whole product into 8 modules. Then I made a list of all pages I need to design based on PRD and user flows.
4. Design exploration
Finally, we entered the design part. In this step, I worked on exploring visual styles and interaction design pattern.
I designed some concept pages and components of the product and I categorized them into different solutions. Then I built simple prototypes on Invision and share these solutions with clients.
After few rounds of iteration, we knew our design direction.
Visual design
We want to align the style with client's brand and create a consistent brand identity. So we brought some design elements and patterns from their website and products.
Interaction design
We focused on finding the most productive components, including navigation, layout and table design. We used Invision to collaborate with client and gathered their feedback.
Design exploration: login page.
Design exploration: home and members page.
Solution
1. Accounts & Permissions
Setting up accounts was the first step of building the product. Considering the efficiency of manage members and receive notifications, we chose the work email as the login method. All accounts would be created and managed by the administrator.
- Administrator account: Created by default, assigned to the head of sales.
- Team members' accounts: Created by the administrator. After adding a member's email into the system, he/she would receive an email, then he/she can setting up password by clicking the URL in the email.
- Partners' accounts: Partners chose an employee as the contact, then administrator would add the contact's work email into the system.
After setting up accounts of different roles, we needed to consider the design of permissions. We untangled this complex problem in these following steps:
1.1 Permissions breakdown
We broke down each role's permission into smallest pieces, then we set three permissions for each feature module: Invisible, Read only and Edit. The administrator could decide member's permission when he created accounts.
We also made a permission for login module: On and Off. For employees who already leave the company, the login permission should be turned off.
1.2 Set up reporting relationship
When administrator create a new account for member, he can choose the direct supervisor of the member by selecting in the form. In this way we could build the tree topology of entire team.
1.3 Default permissions for different departments
Some departments had fixed permissions in the system. In order to make it easier for administrator, we would switch to the default permission setting when he selected member's department.
Set permissions for members
Tree topology design for members with different permissions.
2. Information Architecture
After solving the challenge of accounts and permissions, we began to set up the information architecture for the product.
The main job of this step was designing the navigation. We had several design exploration before, and we gathered some feedback from our client. Considering the scenarios of different roles using the product, we chose the most intuitive and flexible one.
Then we started to design specific feature modules based on the page list I made before. We set up priority for each module. I designed them from high priority to low. When a module was finished, I would share this part with client and developers, ask for their feedback. Then I would fix in the next update. If everyone had no more questions about this part, developers would start to code.
In this way, we can communicate effectively and avoid hidden risks.
Navigation for members with different permissions.
3. Log and version history
In order to track every change happens in the system, we divided the log into two categories: project's log and user's log.
A user's log tracked all the behaviors of this user on the product.
A project's log tracked all changes happen to this project, it usually involved multiple users.
Every piece of log would contain these elements: People, Action, Object(Content), Time. I listed all the log events that needed to be tracked and copy for these events.
3.1 Project version history
Every time members update a project, we will save a new version for this project. By clicking different version's name, users can check the information being modified in this update.
3.2 Project log
Tracking all changes made on this project. Every time members update a project, a log will be generated.
3.3 User log
Tracking all the behaviors of this user on the product.
Log and version history.
4. Notification
Notification was one of the fundamental function of the product. It played a very important role throughout the product. In some way, notification could determine the effectiveness of entire workflow.
We spent a lot of time on designing the form and content of notifications:
- Listed all kinds of notifications on Paper, each notification would contain these elements: Action, Target user, Notification method and copy.
- Prioritized all the notifications and chose the right way to send notifications.
- Wrote copy for each notification.
In order to ensure important notifications won't be missed, we decided to send notifications through these 3 ways.
4.1 Notification page
Display all kinds of notifications.
4.2 Email notification
Only send important notifications via email which need to take action immediately.
4.3 Notification module on homepage
Display unread notifications as a CTA button, to help users check notifications easily.
Display notifications across multiple pages.
5. Other pages
Things I learned
This project is the most complicated project our studio has ever done. As the only designer, it’s a huge challenge to deal with this large-scale project. In the beginning, I had no clue about where to start. I spent about one month on understanding the problems client was facing, and another month on designing the UI/UX. During the process, I’m not only responsible for delivering all the UI/UX design, but also take the responsibility of product manager and project manager.
Design is not only about being able to design the UI of the product; but also about understanding the product from a business perspective.
Understanding the problems may be the most important part of designing a product.
- UI/UX design is only a small part of entire process.
- Only if you truly understand the problems, good design solutions will come out.
- User research is an effective way to help you understand the problems.
I got a lot of experience in tackling complex problems through this project. It also gives me the confidence to deal with complicated products in the future.